
Watermelon Martini: An Invigorating Cocktail Recipe
### Kick Off Summer with a Tasty Watermelon Martini
This Watermelon Martini is a light and invigorating cocktail that captures the sweet, juicy essence of fresh watermelon in every sip. Crafted with straightforward ingredients and shaken until perfectly icy, it’s a lively drink that’s perfect for hot summer afternoons, backyard parties, or happy hour at your place. The naturally sweet watermelon complements vodka splendidly, creating a smooth and fruity martini that’s both sophisticated and simple to prepare.
#### Ingredients for the Recipe
– **Vodka** – The primary spirit in this cocktail.
– **Fresh Watermelon Juice** – Created by blending watermelon in a blender or food processor.
– **Simple Syrup** – Introduces sweetness to amplify the sweetness of the watermelon.
– **Cointreau** – Alternatively, use triple sec or any orange liqueur of your choice.
#### Steps to Prepare A Watermelon Martini
1. **Blend Watermelon**: Put pieces of watermelon into a blender or food processor and blend until smooth.
2. **Strain Juice**: Strain the blended watermelon into a measuring cup using a fine mesh strainer to eliminate all the pulp and seeds.
3. **Combine Ingredients**: In a cocktail shaker filled with ice, add the vodka, Cointreau, fresh lime juice, watermelon juice, and simple syrup.
4. **Shake**: Shake vigorously for 30 seconds.
5. **Serve**: Pour into your preferred martini glass, garnish with a slice of watermelon, and savor!
#### Frequently Asked Questions
– **What can I use to garnish my watermelon cocktail?**
Options for garnishing this martini include a sugared rim, a slice of watermelon, or small watermelon pieces on a toothpick. A mint leaf can also be added for decorative purposes.
– **Is vodka required for this watermelon martini recipe?**
No, if you wish, you can substitute gin as the primary alcohol in this cocktail.
#### Storage Guidelines
You can keep this watermelon vodka martini in your refrigerator for 1-2 days.
#### Additional Cocktail Recipes To Enjoy
Having the appropriate tools makes crafting homemade cocktails easier, more reliable, and more enjoyable. Delight in this Watermelon Martini and discover other refreshing cocktails to elevate your summer experience.
Drink responsibly. This post and recipe are designed for individuals of legal drinking age.
Read More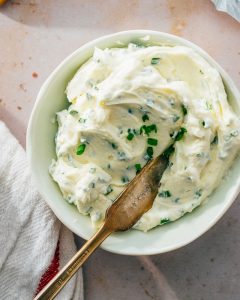
Cream Cheese with Chives
Recipes by Alex & Sonja
Introducing Alex and Sonja Overhiser, the energetic pair behind the well-loved food blog, A Couple Cooks. As authors of cookbooks, active parents, and a genuine couple, they have been documenting their culinary adventures since 2010. Their blog serves as a rich resource for straightforward, seasonal recipes, healthy meal prep strategies, and the simple pleasure of cooking as a family unit. Each recipe is carefully crafted and photographed by Alex and Sonja, guaranteeing a personal touch in every creation. Additionally, every recipe undergoes thorough testing by their two children, making them ideal for family meals.
The Inspiration Behind A Couple Cooks
The Overhisers’ enthusiasm for cooking started as a collective pastime, which soon transformed into a passion for crafting and sharing wholesome, delightful meals. Their mission is to motivate others to take up home cooking, utilizing fresh and seasonal produce. They maintain that cooking should be enjoyable and accessible to all, regardless of expertise.
What You’ll Find on A Couple Cooks
The blog hosts a diverse selection of recipes, ranging from swift weeknight meals to grand weekend celebrations. Whether you’re in search of vegetarian, vegan, or gluten-free choices, Alex and Sonja cater to every palate. Their recipes are crafted to be both nourishing and gratifying, demonstrating that healthy eating can be anything but dull.
Healthy Meal Planning Tips
Beyond recipes, A Couple Cooks provides insightful tips on meal planning and prep. Alex and Sonja recognize the hurdles of balancing busy lives with healthy dining, so they offer practical strategies for efficient meal planning, minimizing food waste, and maximizing your time in the kitchen.
The Joy of Cooking Together
A fundamental principle of A Couple Cooks is the joy derived from cooking together. Alex and Sonja promote couples and families to engage in the kitchen, crafting meals and memories side by side. Cooking transcends mere food; it’s about the experience and the bonds formed throughout the process.
Conclusion
Recipes by Alex and Sonja Overhiser offer more than merely delightful dishes; they present an entryway to a healthier, more interconnected way of living. Through their blog, A Couple Cooks, they continue to motivate countless individuals and families to explore the joys of cooking and dining together. Whether you’re an experienced cook or an amateur in the kitchen, Alex and Sonja’s recipes are guaranteed to add flavor and enjoyment to your table.
Read More
Whiskey and Ginger Ale Drink
Recipes by Alex & Sonja
Introducing Alex & Sonja Overhiser, the energetic pair behind the beloved food blog, A Couple Cooks. As authors of cookbooks, active parents, and a couple who genuinely enjoys cooking together, they have been motivating home chefs since 2010. Their adventure started with a desire to share uncomplicated, seasonal recipes that bring happiness to both the kitchen and the dining table.
Alex and Sonja’s cooking philosophy is centered around crafting nutritious, tasty meals that everyone can make. Their recipes emphasize fresh, seasonal produce, making it simple for home cooks to add healthy foods into their everyday routines. Whether you’re just starting in the kitchen or are an experienced chef, their friendly approach and straightforward instructions make cooking a pleasurable experience.
A highlight of A Couple Cooks is the couple’s commitment to meal planning. They provide useful tips and techniques to assist busy families in organizing their meals effectively, making healthy eating both attainable and enjoyable. With two kids of their own, Alex and Sonja are well aware of the challenges in balancing family life with nutritious meal prep, and they generously share their insights with their audience.
Each recipe featured on their blog is carefully composed and beautifully photographed by Alex and Sonja themselves. Their meticulous attention to detail guarantees that every dish not only tastes incredible but also presents beautifully. The couple’s two children serve as the ultimate taste testers, ensuring that each recipe is kid-approved and family-friendly.
From fulfilling breakfasts to satisfying dinners, and everything in between, A Couple Cooks presents a wide variety of recipes to cater to all preferences and dietary needs. Whether you’re in search of vegetarian choices, gluten-free meals, or decadent desserts, Alex and Sonja have you covered.
Alongside their blog, Alex and Sonja have penned cookbooks that delve deeper into their passion for cooking and sharing meals with family and friends. Their books reflect their dedication to making healthy, delightful food available to everyone.
Join Alex and Sonja on their culinary adventure and experience the pleasure of cooking with A Couple Cooks. With their support, you’ll discover that preparing wholesome, flavorful meals is not only feasible but also deeply satisfying.
Read More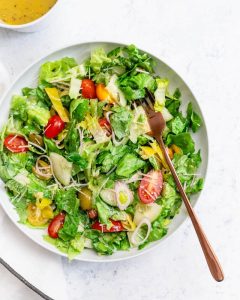
An All-Encompassing Manual to the 60 Finest Salad Recipes
Here are my perpetual favorite salad recipes, ranging from fresh green salads and robust grain and bean salads to pasta salads: each one a tried-and-true favorite deserving of regular preparation!
During the 15 years I’ve dedicated to recipe creation, I’ve observed that a great salad isn’t solely about the ingredients: it’s also about contrasts. You need a crunchy element alongside a creamy one, sharp flavors beside sweet ones, and an array of vibrant colors.
When someone inquires about my most consumed foods, I always respond, “a delicious salad!” Here’s a compilation of my beloved salad recipes that I genuinely enjoy. Each of them was crafted by me and sampled by my actual family. I’ve categorized them by type for your convenience. Let’s make some salad!
Table of Contents
Green Salad Recipes
Green salads form the cornerstone of my salad collection. These recipes feature fresh lettuces, kale, or mixed greens.
1. Chopped Salad: This chopped salad has attained legendary status in my household. The magic occurs with zesty pepperoncini and my homemade Italian dressing that’s vibrant and perfectly balanced, accompanied by crisp romaine and crunchy vegetables. [Get Recipe](https://www.acouplecooks.com/chopped-salad/)
2. Kale Salad: I’ve presented this massaged kale salad to numerous individuals who claimed they “didn’t enjoy kale” and converted every last one. The secret lies in the preparation: I massage the kale leaves with lemon juice and olive oil until tender, then incorporate freshly grated Parmesan and a dash of red pepper flakes. [Get Recipe](https://www.acouplecooks.com/kale-salad-recipe/)
3. Caesar Salad: My Caesar salad employs a homemade Caesar dressing that’s creamy and garlicky without being overwhelming. The blend of crisp romaine, creamy dressing, crunchy croutons, and sharp Parmesan consistently delivers the ultimate bite. [Get Recipe](https://www.acouplecooks.com/caesar-salad/)
4. Arugula Salad: My arugula salad might be the simplest salad recipe you’ll prepare! You don’t even have to whip up a salad dressing. Simply dress baby arugula with olive oil and lemon juice, then add Parmesan shavings and thinly sliced shallots. Pair it with roasted beets for Arugula Beet Salad. [Get Recipe](https://www.acouplecooks.com/easy-arugula-salad/)
5. Apple Salad: In my family’s favorite apple salad, crisp tart apple slices team up with pomegranate seeds, creamy goat cheese, and crunchy, cinnamon-spiced pecans. Toss them over fresh greens with a tangy maple and apple cider vinegar dressing. Another option is Apple Walnut Salad. [Get Recipe](https://www.acouplecooks.com/apple-salad/)
6. Mediterranean Salad: This salad features crunchy veggies like cucumber and onion, salty bursts of feta cheese and Kalamata olives, and handfuls of fresh herbs. Finish it off with our Greek Salad Dressing. You can also add chicken, salmon, shrimp, or tofu to turn it into a main dish. [Get Recipe](https://www.acouplecooks.com/mediterranean-salad/)
7. Wedge Salad: Classics are classics for a reason, and my favorite classic wedge salad certainly delivers! The crunch of iceberg lettuce against the creamy, savory blue cheese dressing simply makes sense. [Get Recipe](https://www.acouplecooks.com/wedge-salad/)
8. Romaine Lettuce Salad: This romaine salad with a pale green dressing and delicate pink radishes tastes as delightful as it appears. The Green Goddess dressing elevates it, enveloping everything in herby, savory creaminess. Sprinkle with crunchy breadcrumbs, a playful alternative to croutons. [Get Recipe](https://www.acouplecooks.com/romaine-lettuce-salad/)
9. Butter Lettuce Salad: I adore a lovely butter lettuce salad, and this one is a favorite of mine. The delicate lettuce leaves are irresistible when coated in creamy, savory Parmesan Peppercorn dressing and garnished with a few simple veggies and Parmesan shavings. [Get Recipe](https://www.acouplecooks.com/butter-lettuce-salad/)
10. Italian Salad: This Italian salad is brimming with all the right flavors and textures: crisp lettuce, crunchy garlic croutons, and zesty pepperoncini. It’s drizzled with a robust, herby Italian vinaigrette that makes the flavors come alive! It can accompany just about anything. [Get Recipe](https://www.acouplecooks.com/italian-salad/)
11. Mexican Salad: [Get Recipe](https://www.acouplecooks.com/easy-mexican-salad/)
12. Massaged Kale Salad: This massaged kale salad is genuinely my go-to salad recipe: lemony greens,
Read More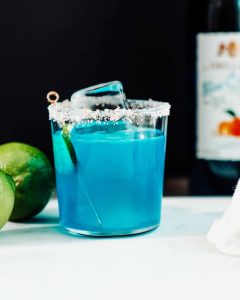
Recipe for a Blue Margarita Drink
**How to Prepare a Blue Margarita Pitcher for a Crowd**
If you’re organizing a get-together and aim to dazzle your attendees with a lively and revitalizing cocktail, a Blue Margarita is a superb option. This visually appealing drink merges the traditional tastes of a margarita with the stunning blue color of blue curaçao. Here’s how to make a pitcher that yields eight servings.
**Ingredients:**
– 2 cups of tequila
– 1 cup of blue curaçao
– 1 cup of lime juice
– 3 handfuls of ice
**Instructions:**
1. **Combine the Ingredients:** In a sizable pitcher, mix 2 cups of tequila, 1 cup of blue curaçao, and 1 cup of lime juice. The mixture of these components will yield the ideal blend of sweetness, acidity, and citrus notes.
2. **Incorporate Ice:** Introduce 3 handfuls of ice into the pitcher. Stir the concoction thoroughly until it is completely chilled. The ice will not only cool the beverage but will also slightly dilute it, enhancing its refreshing quality.
3. **Distribute:** After the mixture is cool, pour the Blue Margarita into separate glasses. You may garnish each glass with a lime slice or a salted rim for an added touch of elegance.
**Tips for the Ideal Blue Margarita:**
– **Selecting Tequila:** Choose a high-quality blanco or silver tequila, as its clean and fresh taste pairs well with the other components.
– **Lime Juice:** For the best flavor, freshly squeezed lime juice is advisable, but bottled lime juice can serve as an alternative in a pinch.
– **Blue Curaçao:** This liqueur not only imparts color but also a sweet orange taste. If you prefer a less sugary beverage, feel free to modify the quantity of blue curaçao according to your preference.
– **Presentation:** For a celebratory element, think about serving the margaritas in glasses with salted rims. To achieve this, rub a lime wedge around the rim of each glass and dip it into coarse salt.
This Blue Margarita recipe is ideal for parties and events, providing a wonderful twist on the classic margarita. Its lively color and refreshing flavor are bound to impress your guests. Enjoy responsibly!
Read More
An Extensive Compilation of 25 Favored Pizza Toppings
Recipes from Alex & Sonja
Introducing Alex and Sonja Overhiser, the energetic pair behind the well-known food blog, A Couple Cooks. As authors of cookbooks, busy parents, and a real-life couple who enjoy cooking together, they have inspired home cooks since 2010. Their blog is a goldmine of straightforward, seasonal recipes, healthy meal planning suggestions, and a commemoration of the happiness that cooking can bring to everyday moments.
The culinary adventure of Alex and Sonja started with a mutual love for nourishing, tasty food. Over time, they have refined their kitchen skills, creating recipes that are not only healthy but also simple to make. Their cooking style highlights the importance of fresh, seasonal ingredients, resulting in dishes that are both lively and delicious.
A distinctive feature of A Couple Cooks is that all recipes are developed and photographed by Alex and Sonja themselves. This personal element guarantees that each dish is showcased in a manner that is both attractive and easy to follow. Their two children also contribute significantly to this process, acting as eager taste testers for their culinary endeavors.
Beyond recipe sharing, Alex and Sonja provide useful meal planning advice that assists busy families in adopting healthy eating habits in their everyday lives. Their blog includes an array of meal plans, from quick dinners during the week to grand weekend celebrations, all aimed at making home cooking a more enjoyable and feasible activity.
<p/Whether you are an experienced home chef or just beginning, A Couple Cooks offers an abundance of inspiration and practical guidance. With their emphasis on simplicity, seasonality, and the joy of cooking, Alex and Sonja Overhiser welcome you to embark on a delightful journey that celebrates the craft of cooking and sharing meals with those you cherish.
Read More
Gibraltar Coffee: An Overview of the Espresso-Infused Drink
Recipes from Alex & Sonja
Introducing Alex and Sonja Overhiser, the energetic pair behind the widely loved food blog, A Couple Cooks. As authors of cookbooks, busy parents, and a real-life couple who delight in cooking together, they have been motivating home cooks since 2010. Their blog serves as a resource of uncomplicated, seasonal recipes, nutritious meal planning advice, and a celebration of the joy that cooking can bring into daily life.
Alex and Sonja’s culinary adventure started with a mutual enthusiasm for crafting delightful meals that are both wholesome and easy to access. Over the years, they have refined their kitchen capabilities, creating recipes that are not only tasty but also simple to make. Their cooking philosophy highlights the use of fresh, seasonal produce, rendering their dishes healthy and eco-friendly.
One of the remarkable aspects of A Couple Cooks is the genuineness and warmth that Alex and Sonja infuse into their content. Each recipe is carefully composed and beautifully photographed by the couple, ensuring that readers can effortlessly recreate the dishes at home. Their two children often participate as taste testers, adding an additional level of family endorsement to their culinary creations.
From hearty breakfasts to fulfilling dinners, Alex and Sonja provide a broad spectrum of recipes that accommodate various dietary needs and lifestyles. Whether you seek vegetarian dishes, gluten-free options, or simply a quick weeknight meal, their blog has something for everyone. Along with recipes, they offer useful meal planning strategies that assist busy families in streamlining their cooking habits without compromising flavor or nutrition.
Beyond the recipes, A Couple Cooks stands as a testament to the joy and connection that cooking together can nurture. Alex and Sonja’s collaboration in the kitchen reflects their shared principles and affection for each other, making their blog not only a source of recipes but also an inspiration for couples and families aiming to strengthen their relationships through the art of cooking.
In a world where fast food and convenience meals often take precedence, Alex and Sonja Overhiser remind us of the significance of slowing down, savoring every moment, and discovering joy in the simple act of preparing and sharing a meal. Their blog, A Couple Cooks, remains a guiding light of culinary innovation and family unity, motivating readers to embrace the joy of cooking one recipe at a time.
Read More
How to Prepare BBQ Soy Curls: A Detailed Recipe Guide
**The Definitive Guide to Storing and Reheating Soy Curls**
Soy curls, a flexible and protein-dense meat alternative, have gained popularity among those in search of plant-based options. Whether you are an experienced vegan or just trying new dietary choices, knowing how to store and reheat soy curls is crucial for preserving their texture and taste. This guide offers comprehensive details on the optimal practices for storing both cooked and uncooked soy curls, ensuring they continue to be a staple in your kitchen.
**Storing Cooked Soy Curls**
After cooking your soy curls, it’s vital to store them correctly to uphold their quality and safety. Cooked soy curls can be kept in the refrigerator for a maximum of 4 days. For this, place them in an airtight container to avoid exposure to air and moisture, which can cause spoilage. When you’re ready to enjoy them again, reheating is straightforward. Heat the soy curls in a skillet over medium heat, adding a dash of BBQ sauce to amplify their flavor. This approach helps preserve their texture, making them just as delightful as when freshly cooked.
**Freezing Cooked Soy Curls**
Although not personally tried, freezing cooked soy curls is a practical method for prolonging their shelf life. To freeze, place the cooked soy curls in an airtight container or a heavy-duty freezer bag, removing as much air as possible to avoid freezer burn. When stored correctly, they can last in the freezer for up to 2 months. When ready for use, thaw the soy curls in the refrigerator overnight before reheating them in a skillet as outlined above.
**Storing Uncooked Dry Soy Curls**
Uncooked soy curls have a significantly extended shelf life, making them an excellent pantry essential. Store them in an airtight container in a cool, dry location, such as a pantry, to keep them fresh for up to 1 year. The key is to shield them from moisture and heat, which can diminish their quality over time. By maintaining them in ideal conditions, you’ll always have a handy and nutritious ingredient available for quick meals.
**Conclusion**
Soy curls represent a versatile and convenient choice for anyone aiming to integrate more plant-based foods into their diet. By adhering to these storage and reheating recommendations, you can guarantee that your soy curls remain fresh and tasty, whether cooked or uncooked. With their extended shelf life and ease of preparation, soy curls are a valuable addition to any kitchen, ready to be crafted into a wide array of flavorful dishes.
Read More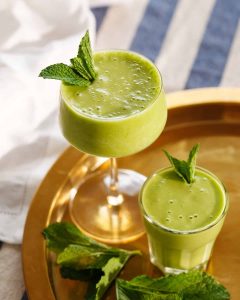
Revitalizing Pineapple and Mint Slush Beverage
Recipes from Alex & Sonja
Introducing Alex and Sonja Overhiser, the energetic pair behind the cherished food blog, A Couple Cooks. As cookbook writers, busy parents, and a real-life couple who find happiness in cooking side by side, they have been motivating home cooks since 2010. Their blog is a rich source of uncomplicated, seasonal recipes, healthy meal planning advice, and culinary creativity, all made with care and tested by their family, which includes their two children.
Alex and Sonja’s adventure into the culinary arts started with a common love for nutritious, tasty food. Throughout the years, they have refined their abilities and crafted a distinctive approach that highlights fresh produce and straightforward methods. Their recipes are inviting, yet full of flavor, making them ideal for both beginner cooks and experienced chefs searching for fresh inspiration.
A standout feature of A Couple Cooks is the focus on seasonal cooking. Alex and Sonja advocate that utilizing ingredients at their finest not only elevates a dish’s flavor but also supports local growers and fosters environmental sustainability. Their blog boasts recipes that honor the abundance of each season, from lively spring salads to comforting winter stews.
Alongside recipes, Alex and Sonja provide useful meal planning tips to assist busy families in eating well without the hassle. They recognize the complexities of balancing work, parenting, and cooking, and offer practical guidance to simplify the task. Whether it’s batch cooking, meals suitable for the freezer, or swift weeknight dinners, their tips aim to make healthy eating easy and pleasurable.
Photography is another vital aspect of A Couple Cooks. Every recipe is beautifully captured by Alex and Sonja, showcasing the essence of each dish and encouraging readers to recreate them at home. Their photographs are not only aesthetically pleasing but also act as a helpful reference for presentation and plating.
Beyond their blog, Alex and Sonja have written cookbooks that explore their culinary principles in greater depth. These books expand on their online identity, presenting readers with a tangible resource filled with new recipes and insights into their cooking journey.
In the end, A Couple Cooks is more than just a food blog; it’s a tribute to the joy of cooking and the ability of food to unite people. Alex and Sonja’s recipes reflect their conviction that cooking should be enjoyable, nourishing, and a communal experience. Whether you’re in search of a quick dinner solution or an impressive dish for a special event, their blog is a go-to place for delicious inspiration.
Read More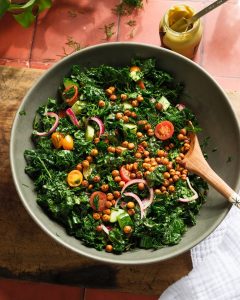
Preferred Recipe: Massaged Kale Salad
Recipes by Alex & Sonja: A Culinary Adventure
Introducing Alex and Sonja Overhiser, the talented pair behind the well-loved food blog “A Couple Cooks.” Since 2010, this real-life couple has been conveying their enthusiasm for cooking through straightforward, seasonal recipes that infuse delight into the kitchen. As authors of cookbooks and busy parents, Alex and Sonja have perfected the skill of preparing meals that are not only tasty but also easy to make, making them ideal for both families and individuals.
Their adventure commenced with a mutual affection for food and a wish to motivate others to cook at home. Throughout the years, they have curated a diverse selection of recipes that accommodate various dietary needs, including vegetarian, vegan, and gluten-free choices. Each recipe is carefully designed and tested, not only by Alex and Sonja but also by their two children, ensuring that every dish receives family approval.
One of the distinguishing features that sets Alex and Sonja apart is their emphasis on seasonal ingredients. By utilizing fresh, locally-sourced produce, they craft meals that are both nutritious and tasty. Their blog is filled with advice on healthy meal planning, assisting readers in incorporating more whole foods into their diets without compromising on flavor or convenience.
Visuals play a vital role in their blog, with each recipe expertly photographed to attract and motivate. The vivid images highlight the colors and textures of the dishes, making it simple for readers to visualize the final result and inspiring them to attempt the recipes themselves.
In addition to recipes, Alex and Sonja share their thoughts on the pleasure of cooking as a couple. They are convinced that cooking is not only about nourishing the body but also about strengthening relationships and creating lasting memories. Their blog provides a window into their life as a family, with narratives and anecdotes that resonate with readers who have similar experiences.
Whether you are an experienced chef or a kitchen beginner, “A Couple Cooks” offers a plethora of resources to assist you on your culinary journey. From quick weeknight meals to grand weekend gatherings, Alex and Sonja have something to suit everyone. Their commitment to making cooking approachable and enjoyable is evident in every recipe they prepare, establishing them as a cherished resource for home cooks around the globe.
Read More