
A Comprehensive Guide to Flawlessly Roasting Brussels Sprouts on Every Occasion
**A Comprehensive Guide to Masterfully Roasting Brussels Sprouts Every Time**
Brussels sprouts, frequently misjudged and at times criticized, can be converted into a delectable side dish when roasted ideally. This guide will lead you through the method of roasting Brussels sprouts to enhance their natural sweetness and achieve a pleasing crispy texture.
**Step 1: Choosing the Brussels Sprouts**
Begin by selecting fresh Brussels sprouts. Seek small to medium-sized sprouts that are firm, vibrant green, and devoid of yellowing or wilting leaves. Smaller sprouts generally offer more sweetness and tenderness.
**Step 2: Preparing the Sprouts**
1. **Wash and Trim:** Rinse the Brussels sprouts under cool water to eliminate any dirt or particles. Trim the stem ends and discard any outer leaves that are discolored or damaged.
2. **Halve the Sprouts:** Slice the Brussels sprouts in half lengthwise. This enlarges the surface area for caramelization and guarantees even cooking.
**Step 3: Seasoning**
1. **Oil:** Place the halved Brussels sprouts in a spacious mixing bowl. Drizzle with olive oil, ensuring that each sprout receives a light coating. This aids in crisping them up in the oven.
2. **Season:** Add salt and freshly ground black pepper according to your preference. For an extra kick, you might want to add garlic powder, onion powder, or a sprinkle of red pepper flakes for heat.
**Step 4: Roasting**
1. **Preheat the Oven:** Heat your oven to 400°F (200°C). A heated oven is essential for attaining crispy, caramelized edges.
2. **Arrange on a Baking Sheet:** Distribute the seasoned Brussels sprouts in a single layer on a baking sheet, cut side down. This maximizes contact with the heated surface, encouraging browning.
3. **Roast:** Insert the baking sheet into the preheated oven. Roast for 20-25 minutes, flipping the sprouts halfway through. They should appear golden brown and crispy on the outside while being tender on the inside.
**Step 5: Final Touches**
1. **Add Acidity:** After removing from the oven, drizzle the roasted Brussels sprouts with a splash of balsamic vinegar or lemon juice to elevate the flavors.
2. **Optional Add-Ins:** For additional flavor, contemplate tossing the sprouts with toasted nuts, grated Parmesan cheese, or crispy bacon bits before serving.
**Step 6: Serving**
Serve the roasted Brussels sprouts warm as a side dish. They complement a range of main courses, from roasted chicken to grilled fish.
By following these steps, you can savor perfectly roasted Brussels sprouts every time, transforming this modest vegetable into a crowd-pleasing favorite.
Read More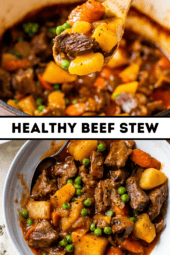
Protein-Rich Homemade Beef Stew Loaded with Vegetables
**Protein-Rich Homemade Beef Stew Loaded with Vegetables**
Beef stew is a timeless comfort dish that families have relished for generations. It features hearty pieces of beef combined with a mix of vegetables, all cooked together in a savory, rich broth. The appeal of this dish is further enhanced by its high protein content, making it a superb option for those looking to boost their protein consumption while savoring a delightful meal. In this article, we will delve into the process of crafting a protein-rich homemade beef stew loaded with vegetables, ideal for any gathering.
**Ingredients:**
For a wholesome and protein-packed beef stew, gather the following ingredients:
– 2 pounds of beef chuck, diced into 1-inch cubes
– 2 tablespoons of olive oil
– 1 large onion, diced
– 3 cloves of garlic, minced
– 4 cups of beef broth
– 1 cup of red wine (optional for additional flavor depth)
– 2 tablespoons of tomato paste
– 1 teaspoon of dried thyme
– 1 teaspoon of dried rosemary
– 2 bay leaves
– Salt and pepper to taste
– 4 large carrots, peeled and sliced
– 3 large potatoes, peeled and cubed
– 2 cups of chopped celery
– 1 cup of frozen peas
– 1 cup of green beans, trimmed and cut into 1-inch pieces
– 1 cup of mushrooms, sliced
**Instructions:**
1. **Brown the Beef:** Start by heating the olive oil in a large pot or Dutch oven over medium-high heat. Add the beef cubes in batches to avoid overcrowding. Brown the beef on all sides, then remove it and set it aside.
2. **Sauté the Aromatics:** In the same pot, toss in the chopped onion and garlic. Sauté until the onion becomes translucent and aromatic, about 5 minutes.
3. **Deglaze the Pot:** Pour the red wine (if using) into the pot to deglaze, scraping up any browned bits from the bottom. Let the wine reduce by half.
4. **Build the Broth:** Add the beef broth, tomato paste, thyme, rosemary, bay leaves, salt, and pepper. Stir thoroughly to combine.
5. **Simmer the Stew:** Return the browned beef to the pot. Bring the mixture to a boil, then lower the heat to a simmer and cover. Let the stew simmer for about 1.5 to 2 hours, or until the beef reaches tenderness.
6. **Add the Vegetables:** Once the beef is tender, incorporate the carrots, potatoes, and celery into the pot. Continue to simmer for another 30 minutes, or until the vegetables are tender.
7. **Finish with Peas and Green Beans:** Mix in the frozen peas and green beans, cooking for an extra 5-10 minutes until heated through.
8. **Serve:** Remove the bay leaves before serving. Ladle the stew into bowls and enjoy a hearty, protein-rich meal.
**Nutritional Benefits:**
This homemade beef stew is not only delicious but also brimming with nutritional advantages. Beef is a fantastic source of high-quality protein, crucial for muscle development and repair. The variety of vegetables in the stew contributes a wealth of vitamins, minerals, and dietary fiber, enhancing overall health and well-being. Carrots are high in beta-carotene, potatoes provide potassium, and green beans and peas deliver a dose of vitamin C and folate.
**Conclusion:**
A protein-rich homemade beef stew loaded with vegetables is a fulfilling and nutritious meal that the entire family can enjoy. It’s a versatile dish that can be tailored with your favorite vegetables and spices, becoming a staple in any kitchen. Whether served on a cold night or as a comforting dish after a busy day, this beef stew is sure to satisfy and nourish.
Read More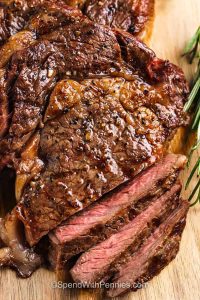
A Comprehensive Guide to Crafting a Tasty Steak Dinner at Home
### Ideal Ribeye Steak Recipe
This Ribeye Steak recipe produces juicy, tasty steaks with a beautifully seared outer layer and a buttery finish, all done on the grill. With straightforward seasoning and a brief resting period, you can achieve steakhouse-level quality in just a few simple steps.
#### Serving Ideas
I enjoy pairing this steak with basic oven-roasted potatoes, a tomato burrata salad, and corn on the cob grilled to perfection.
—
### Holly’s Recipe Features: Ideal Ribeye Steaks
– **Taste:** Succulent and richly flavored with a savory, smoky crust, buttery finish, and perfectly seasoned profile.
– **Why Prepare It:** Two dependable cooking techniques make it easy to create steakhouse-style ribeye without complicated marinades.
– **Preparation Tip:** Allow the steaks to rest briefly at room temperature before cooking, then season generously right before placing them on the heat.
**Total Duration:** 30 Mins
**Servings:** 2 Steaks
**Cooking Technique:** Grill (or oven)
—
### Ingredient Insights
– **Ribeye Steaks:** Select steaks about 1 inch thick with visible marbling for optimal flavor and tenderness. Boneless ribeyes cook uniformly and are easier to manage, while bone-in varieties may require slightly longer cooking times.
– **Steak Seasoning:** Use your preferred steak seasoning (we favor Montreal Seasoning or Hey Grill Hey Beef Seasoning), or opt for simplicity with kosher salt and black pepper.
– **Butter:** Enhances richness and provides a buttery finish as the steaks rest. It’s optional, but homemade steak butter can add an additional flavor dimension.
—
### Steps to Create Ideal Ribeye Steak
1. Allow the steak to reach room temperature. Coat with oil and season well.
2. Grill or sear in a cast-iron skillet, finishing in the oven.
3. Move to a plate, add butter on top, and loosely tent with foil.
Allow the steaks to rest and then serve.
—
### Success Tips
– **Dry Off:** Bring the steak to room temperature, then dry it off before applying oil and seasoning. Reducing surface moisture promotes better browning.
– **Employ a Thermometer:** Steak thickness, initial temperature, grill heat, and skillet temp can influence cooking time. Refer to a steak temperature and doneness chart as internal temperature is more reliable than time.
– **Consider Carryover Cooking:** The steak will continue to warm by 5°F after being removed from the heat. Check the temperature toward the cooking’s conclusion rather than waiting until it appears cooked.
– **Ensure Space:** Use a large skillet to prevent crowding the steaks and cook in batches if needed.
—
### Preserve That Steak
Store leftovers in a sealed container in the refrigerator for up to 4 days and in the freezer for as long as 6 months.
—
### Cooking Procedure
1. Take steaks out of the fridge at least 45 minutes prior to cooking.
2. Preheat the grill to medium heat (around 375°F).
3. Right before cooking, rub steaks with olive oil and season generously to your preference.
4. Grill for 5 to 6 minutes per side for medium-rare, or 6 to 7 minutes per side for medium.
5. Remove from the grill and top with a pat of butter, loosely cover with foil. Let the steaks rest for 5 to 10 minutes before serving.
—
### Cooking Durations/Temperatures
Cooking times mentioned are estimates for a 1″ steak and will vary based on thickness and temperature. Remove steaks from the heat roughly 5°F before they reach the desired temperature as the heat will continue to rise. The FDA recommends a minimum temperature of 145°F with a 3-minute rest.
– Rare: 125°F
– Medium-Rare: 135°F
– Medium: 145°F
– Medium Well: 155°F
– Well: 160°F
—
### Nutritional Information (Per Serving)
– **Calories:** 694
– **Carbohydrates:** 1g
– **Protein:** 46g
– **Fat:** 57g
– **Saturated Fat:** 23g
– **Cholesterol:** 168mg
– **Sodium:** 218mg
– **Potassium:** 606mg
– **Sugar:** 1g
– **Vitamin A:** 384 IU
– **Calcium:** 16mg
– **Iron:** 4mg
Nutritional information is an estimate and may differ based on cooking methods and ingredient brands used.
Read More
Vegan Jalapeño Corn Fritter Recipe
# Vegan Corn Fritters: A Delectable Summer Delight
Just when we believed summer’s finest veggie couldn’t become any tastier, corn fritters appeared on our taste buds. These crispy-on-the-outside, soft-on-the-inside, gently spiced fritters are an essential appetizer or side!
Not only are they incredibly tasty, but these fritters are vegan, optionally gluten-free, and REALLY simple to whip up! Grab your mixing bowl and 10 fundamental ingredients, and you’ll be relishing fritters in 30 minutes or less. What’s stopping you? Let’s get started!
## How to Create Vegan Corn Fritters
Transforming classic corn fritters into a vegan recipe involves a few modifications. Firstly, rather than using eggs for binding, we switch to flaxseed meal. Instead of milk, we opt for a neutral-flavored, unsweetened dairy-free milk (homemade cashew is our top pick). The rest of the components are quite traditional, yet we infused these fritters with our unique flavor twist and made them gluten-free!
In addition to flaxseed meal and dairy-free milk, the batter ingredients consist of baking powder for lightness; salt, garlic powder, and nutritional yeast for taste; and all-purpose flour or a gluten-free blend to thicken it.
Aim for a thick, fluffy batter, which can be achieved by adding extra flour or dairy-free milk if necessary. With the batter prepped, we’re just three ingredients away from fritter bliss!
Next, fresh corn is mixed into the chunky batter, along with finely diced jalapeño for a hint of heat. While we love incorporating fresh ingredients during summertime, this recipe also works well with frozen corn—just let it thaw at room temperature, then pat dry with paper towels to eliminate excess moisture. If fresh jalapeño isn’t available, a dash of cayenne could work as a substitute!
Now onto frying! Instead of deep frying, we prefer a shallow fry, cooking for 2-3 minutes per side in avocado oil in a cast iron pan. Not only do we find shallow frying less intimidating, but it reduces the quantity of oil required and boosts the health advantages. Triple win! And still, totally delicious!
Once the fritters are golden on both sides, it’s time to dig in! They’re extraordinarily tasty on their own, but they’re also excellent when paired with a sauce. Try our Go-To Guacamole, Creamy Cashew Jalapeño Sauce, or Easy Vegan Ranch Dressing.
We hope you ADORE these corn fritters! They’re:
– Savory
– Crispy
– Naturally slightly sweet
– Just a bit spicy
– Quick & easy
– REALLY delicious!
This is the ideal appetizer or side to make during peak summer, when fresh corn and jalapeños are abundant! However, they’re so tasty you might find yourself wanting them all year round (in which case, using frozen corn is also a fantastic option).
## What to Accompany Corn Fritters With
These fritters are flavorful without being overly seasoned, making them an excellent match for a variety of other sides and mains, especially grilled proteins, side salads, and anything BBQ-flavored. Here are several tasty combinations:
– Grilled vegetables
– Side salads
– BBQ meals
– Vegan burgers
## More Fresh Corn Dishes
If you give this recipe a try, let us know! Leave a comment, rate it, and don’t forget to tag a photo on Instagram. Cheers!
### Recipe: Vegan Corn Fritters
**Prep Time:** 10 minutes
**Cook Time:** 20 minutes
**Total Time:** 30 minutes
**Servings:** 8 fritters
#### Ingredients
– 2 Tbsp flaxseed meal
– 1/2 cup dairy-free milk (homemade cashew milk preferred)
– 1 Tbsp nutritional yeast
– 1 tsp baking powder
– 1/2 tsp sea salt
– 1/4 tsp garlic powder
– 1/2 cup gluten-free flour blend (or regular all-purpose flour)
– 1 ½ cups corn kernels (fresh or thawed from frozen)
– 1-2 Tbsp finely diced jalapeño (to taste)
– Avocado oil (for frying)
#### Instructions
1. Set up a baking sheet with paper towels and a cooling rack on top to absorb excess oil.
2. In a large mixing bowl, combine flaxseed meal and dairy-free milk. Allow to sit for 5 minutes.
3. Mix in nutritional yeast, baking powder, sea salt, and garlic powder to the flax mixture. Whisk until combined, then add flour and whisk again until thick. Gently incorporate corn and jalapeño. Adjust the consistency with more flour or milk if necessary.
4. Heat a skillet with a thin coat of oil over medium-high heat. Test the oil with a small dollop of

Cucumber Salad with Sesame Vinaigrette and Rice Vinegar
### Cucumber Salad with Sesame and Rice Vinegar
Cucumbers are a common ingredient in numerous kitchens, appreciated for their crisp texture, moisture content, and adaptability. Although they often appear in various meals and snacks, they have been somewhat overlooked in recipe collections. This article introduces an easy yet tasty cucumber salad inspired by the Japanese recipe known as **sunomono**, meaning “vinegared things.” This salad offers a refreshing taste and complements a range of dishes, making it an ideal choice for weeknight dinners.
#### Ingredients
– 1 pound (455 grams) Persian-style cucumbers, trimmed and cut into 1/2-inch pieces
– 1 1/2 teaspoons kosher salt (preferably Diamond brand)
– 3 tablespoons (45 ml) unseasoned rice vinegar
– 1 tablespoon (15 ml) toasted sesame oil
– 1 tablespoon (15 ml) soy sauce
– Ground black or white pepper, to taste
– Chili oil or chili crisp, to taste, or red pepper flakes
– Toasted sesame seeds, for garnish
#### Instructions
1. **Prepare the Cucumbers**: In a bowl, mix the sliced cucumbers with kosher salt. Allow them to rest for at least 10 to 15 minutes, or for up to an hour or two. This step helps remove excess moisture, enabling the cucumbers to soak up the dressing more effectively.
2. **Mix the Dressing**: Once the cucumbers have released some liquid, discard any surplus. Incorporate the rice vinegar, sesame oil, soy sauce, and ground pepper into the cucumbers. Mix thoroughly to combine. Taste and modify the seasoning with additional salt if needed.
3. **Finish and Serve**: Drizzle with chili oil or add red pepper flakes based on your spice preference. Garnish with toasted sesame seeds for extra flavor and crunch.
4. **Storage**: Any leftovers can be kept in the refrigerator for 2 to 3 days, where they will continue to develop taste as they lightly pickle.
This cucumber salad is a flexible side that pairs well with stir-fries, noodle dishes, and dumplings, making it an excellent addition to any meal. Enjoy the refreshing crunch and the delightful mix of flavors that this simple salad brings to your table.
Read More