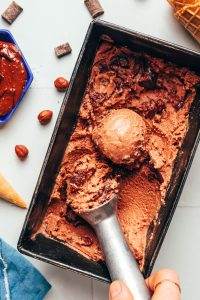
Vegan Chocolate Hazelnut Ice Cream Formula
### Vegan Nutella Ice Cream: A Whimsical Indulgence
Friends! The lightest, most delightful dessert for Nutella enthusiasts has arrived: vegan ice cream crafted with chocolate and hazelnuts. It’s rich, dreamy, incredibly tasty, and quite simply perfection! Especially when you’re in the mood for a sweet indulgence on a balmy summer afternoon.
#### Ingredients
Only **6 ingredients** are needed for this (should we say) MASTERPIECE. It’s destined to be made repeatedly in our ice cream maker throughout the season. Grab your cones. Let’s whip up some Nutella ice cream!
1. **1 cup raw hazelnuts**
2. **1 cup semi-sweet chocolate chips or chunks**
3. **2 (14-oz.) cans light coconut milk**
4. **1/4 cup cane sugar**
5. **1 tsp vanilla extract**
6. **1/8 tsp sea salt**
#### Instructions
1. **Prepare the Ice Cream Maker**: The day before you plan to use it, place your ice cream churning bowl in the freezer to achieve a proper chill.
2. **Toast the Hazelnuts**: Preheat your oven to 350°F (176°C) and spread the hazelnuts in a single layer on a bare baking sheet. If they are raw, roast for about 10-12 minutes. If already roasted, toast them for 8-10 minutes just to warm the natural oils and loosen the skins. Take them out of the oven and let them cool a bit. Then, transfer to a large kitchen towel and use your hands to roll the nuts around to take off most of the skins.
3. **Blend the Hazelnuts**: Move the hazelnuts (skins removed) to a high-speed blender and start blending on low, gradually increasing to high, breaking down the hazelnuts as finely as possible until they resemble small crumbs.
4. **Melt the Chocolate**: In a small saucepan set over low heat, melt the chocolate while stirring continuously, until about half of the chocolate chips have melted (~1 minute). Remove from heat and stir until entirely melted.
5. **Create Nutella**: Pour the melted chocolate into the blender with the hazelnuts. Blend on low, then gradually increase to high until the hazelnut butter is completely smooth and well combined (around 3 minutes). Set aside 3 tablespoons of the mixture for later use.
6. **Incorporate Remaining Ingredients**: To the blender with the rest of the Nutella, add the light coconut milk, cane sugar, vanilla extract, and sea salt. Blend on high until smooth and creamy.
7. **Chill the Mixture**: Pour the mixture into an airtight container and chill in the refrigerator for at least 1 hour.
8. **Churn the Ice Cream**: Add the slightly chilled mixture to your ice cream maker and churn as per the manufacturer’s guidelines (approximately 30 minutes). Drizzle the reserved Nutella on top of the ice cream and gently fold it in to form a swirl.
9. **Freeze or Serve**: You can enjoy your ice cream immediately for a softer consistency, or transfer it to a large freezer-safe container, smooth it with a spoon, cover with parchment paper, and freeze for at least 1 hour or until firm.
10. **Serving**: Allow to sit for 10-15 minutes before serving to soften slightly. Keep well-covered in the freezer for up to 1 month.
#### Nutritional Information (per 1/2-cup serving)
– **Calories**: 277
– **Carbohydrates**: 21.5 g
– **Protein**: 3.6 g
– **Fat**: 21.2 g
– **Saturated Fat**: 9.4 g
– **Cholesterol**: 0 mg
– **Sodium**: 31 mg
– **Potassium**: 103 mg
– **Fiber**: 2.8 g
– **Sugar**: 17 g
– **Calcium**: 44 mg
– **Iron**: 2.2 mg
This ice cream is the ideal dessert for anyone who adores Nutella or is dairy-free/vegan and enjoys ice cream! Relish this creamy, chocolaty, nutty, fluffy, perfectly sweet, light yet fulfilling treat all summer long!
Read More
One-Pot Simple Eggplant Bolognese Recipe
# Eggplant Bolognese: A Tasty Plant-Based Variation on a Classic
When we introduce yet another bolognese to the blog (Yes, we already boast versions 1, 2, 3, and 4), you can bet it’s something unique! This latest recipe features eggplant, making it the ideal bolognese for the end of summer. It’s light yet fulfilling, creamy yet vibrant, and brimming with robust Italian-inspired flavors — everyone will be coming back for more!
Even more exciting? It’s incredibly easy to prepare — just **1 pot** needed! What are you waiting for? Start boiling that pasta water!
## What is Bolognese?
Bolognese is an Italian sauce named after the city of Bologna in Italy. It usually contains meat, soffrito (onions, celery, and carrots), white wine, milk, and tomato paste or sauce, all simmered to create a rich and flavorful sauce.
Our eggplant rendition deviates from the classic as it omits meat (and includes eggplant) and uses dairy alternatives. However, the dish remains quite similar to traditional bolognese and is so hearty it might win over even the most die-hard veggie skeptics!
## How to Prepare Eggplant Bolognese
This **1-pot** eggplant bolognese is everything you desire for a cozy pasta evening, without the hassle! It begins by sautéing onion and carrots to form a simple, savory-sweet base. Next, we incorporate eggplant (cut into tiny cubes) and allow it to sauté until it softens and browns (hello, flavor!).
Enhance the flavor even more with garlic and red pepper flakes, and deglaze the pan with wine. Crushed tomatoes and tomato paste guarantee a **vivid, tomato-centric sauce**, and a splash of dairy-free milk provides a gentle **creaminess and richness**. The final flavor accents include dried Italian herbs (basil + oregano), sea salt, and maple syrup to counteract the tomatoes’ acidity.
Once all the ingredients are combined in your pan, let the heat work its magic. Simmering for at least 20-30 minutes allows the sauce to thicken and intensifies the flavors as liquid evaporates. If you have a bit more time, letting it simmer for up to an hour yields even richer flavor!
When the simmering is complete, you’ll have a delightful, plant-powered sauce ideal for pairing with your favorite pasta! It would also be wonderful over polenta and enhanced by garnishing with fresh basil and homemade vegan parmesan cheese.
We believe you’ll ADORE this eggplant bolognese! It’s:
– Rich
– Savory
– Creamy yet bright
– Light yet fulfilling
– Easy to whip up
– & SO delicious!
It’s the perfect meal for a late summer pasta night! While quick enough for a weekday, it’s impressive enough to serve to dinner guests, particularly when accompanied by our Simple Vegan Meatballs, Pesto Turkey Meatballs, or Chickpea Caesar Salad.
## More Eggplant Dishes
If you try this recipe, share your thoughts with us! Leave a comment, rate it, and don’t forget to tag a photo @minimalistbaker on Instagram. Cheers, friends!
### Recipe: Eggplant Bolognese
#### Ingredients
– 1/4 cup olive oil
– 1 cup finely diced yellow onion
– 1/2 cup finely chopped carrots
– 4 cups diced eggplant (1/4 inch cubes)
– 4 cloves garlic (minced)
– 1/2 tsp red pepper flakes
– 2 Tbsp tomato paste
– 1/2 cup dry red or white wine (optional)
– 1 (28-oz) can crushed tomatoes
– 1 cup dairy-free milk (homemade cashew suggested)
– 1-2 tsp dried Italian seasoning
– 1/2 tsp sea salt
– 1-2 tsp maple syrup
#### For Serving (optional)
– Freshly chopped basil
– Vegan parmesan cheese
– Pasta (recommended: pappardelle or rigatoni)
#### Instructions
1. Heat a large pot over medium heat. When warm, add olive oil and onion. Sauté until translucent, about 5 minutes, then add carrots. Continue sautéing until the onion begins to color and the carrots soften.
2. Incorporate the eggplant and cook for about 10 minutes, stirring occasionally, until softened. If the mixture appears dry, cover the pan to allow the eggplant to steam slightly.
3. Mix in garlic and red pepper flakes and sauté for 1-2 minutes until aromatic.
4. Add tomato paste and cook, stirring frequently, to eliminate any raw tomato flavor.
5. Deglaze the pan with your preferred liquid, stirring continuously to

Kentucky Mule Drink Formula and Background
# Kentucky Mule: A Southern Spin on a Timeless Cocktail
Savor a Southern spin on a timeless cocktail with the Kentucky Mule. This invigorating beverage mixes smooth bourbon, tangy lime, and effervescent ginger beer, crafting a delightful fusion of tastes that is ideal for any occasion.
## Reasons to Adore This Kentucky Mule
– **Ease**: Requires just three ingredients, and no cocktail shaker is necessary to prepare this drink.
– **Flavor Synergy**: The caramel and vanilla undertones from the bourbon harmonize beautifully with the daring ginger taste.
– **Vibrant and Harmonious**: Fresh lime juice enhances the drink’s brightness while balancing the sweetness and warmth of the other components.
## Ingredients for the Recipe
– **Kentucky Bourbon**: Utilizing bourbon as the spirit provides a richer and warmer taste.
– **Fresh Lime Juice**: A vibrant and tangy touch that melds all the flavors seamlessly.
– **Ginger Beer**: The robust and spicy mixer that gives a mule its iconic flavor. Opt for high-quality ginger beer for the best taste.
## Steps to Create a Kentucky Mule
1. **Mix Ingredients**: Pour the Kentucky Bourbon, fresh lime juice, and ginger beer into a copper mug filled with ice.
2. **Stir**: With a bar spoon, stir for 15 seconds to blend and chill the concoction.
3. **Garnish and Savor**: If desired, top with a lime wedge and fresh mint leaves, and enjoy!
## Frequently Asked Questions
**What sets apart a Kentucky Mule from a Moscow Mule?**
The primary distinction lies in the spirit. A Kentucky Mule employs bourbon, while a Moscow Mule features vodka, lending the Kentucky variant a warmer, more robust taste.
**Is it possible to substitute ginger ale for ginger beer in my Kentucky Mule?**
You can do so, but the outcome will be a sweeter drink with diminished classic mule spiciness.
## Storage Details
You may keep any remnants of this Kentucky Mule in an airtight container in your refrigerator for up to 24 hours. Nonetheless, due to the carbonation in ginger beer, it is best relished when made fresh.
## Additional Cocktails to Explore
If you relish this Kentucky Mule, consider trying more bourbon-based cocktails. Having the appropriate tools makes crafting homemade cocktails simpler and more enjoyable.
**Drink Responsibly. This post and recipe are intended for individuals of legal drinking age.**
Read More
Tasty Plant-Based Treats to Please Every Taste Bud
### The Wanderlust Kitchen: A Culinary Adventure Across the Globe
In a realm where gastronomic experiences can whisk us away to far-off places, The Wanderlust Kitchen emerges as a guiding light for both culinary aficionados and travel seekers. Owned by Linda, this colorful platform invites you to delve into a wide variety of recipes that honor both age-old food customs and modern cooking methods.
#### A Taste of Authenticity
At The Wanderlust Kitchen, genuineness is essential. Linda collects recipes that respect the rich culinary legacies of different cultures, guaranteeing that each meal is not merely food but a narrative waiting to unfold. From the zesty curries of India to the exquisite pastries of France, every recipe serves as a portal to grasping the history and importance of the ingredients and techniques employed.
#### Embracing Modern Techniques
Though the recipes honor traditional practices, they also include contemporary methods and ingredients that make cooking approachable and enjoyable for all. Linda motivates her readers to welcome creativity in the kitchen, merging the old and the new to create meals that are simultaneously comforting and thrilling. This blend of tradition and innovation encourages home cooks to experiment and uncover new tastes, transforming cooking into an exhilarating journey.
#### Travel Through Food
A standout feature of The Wanderlust Kitchen is its focus on travel. Each recipe comes with tales and insights from Linda’s personal travel experiences, offering context and inspiration for the dishes. This storytelling approach not only enriches the cooking process but also motivates readers to discover new places through their culinary choices. Whether it’s a street food treasure from Thailand or a hearty Italian pasta recipe, each dish invites you to set off on a gastronomic voyage.
#### Confidence in the Kitchen
Linda’s goal is to boost her readers’ confidence. The Wanderlust Kitchen accommodates cooks of every skill level, with straightforward instructions and advice that make it easy to follow along. Linda believes that cooking should be a joyful journey, free from fear. By offering clear guidance and motivation, she enables her audience to venture beyond their usual practices and explore new recipes.
#### Community and Connection
The Wanderlust Kitchen transcends being merely a recipe site; it fosters a community of individuals who share a love for food and travel. Linda cultivates a sense of camaraderie among her readers, motivating them to share their own culinary inventions and travel tales. This engaging aspect enriches the experience, allowing everyone to gain insights from each other and celebrate the delights of cooking and discovery.
#### Conclusion
In a world that often appears fragmented, The Wanderlust Kitchen unites people through the universal dialect of food. Linda’s commitment to authentic recipes, contemporary techniques, and travel experiences creates a distinct platform that ignites culinary curiosity. So, whether you’re eager to try a new recipe or fantasize about your next travel escapade, The Wanderlust Kitchen is your ultimate resource. Bon Appétit! Bon Voyage!
Read More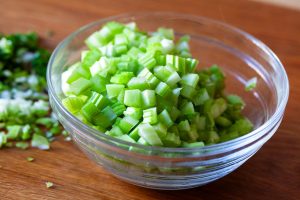
Chicken Salad Recipe for Celery Enthusiasts
# Chicken Salad for Celery Lovers
Chicken salad is a timeless dish that can inspire passionate opinions and preferences. For those who particularly enjoy celery, this recipe presents a delightful option that highlights the crunchy vegetable while guaranteeing a savory and fulfilling meal.
## The Significance of Ingredients
### Chicken Choice
Opting for bone-in, skin-on chicken breasts is vital for obtaining juicy and flavorful meat. Although boneless, skinless alternatives may appear more practical, they frequently lack the richness derived from cooking with the skin and bones. Roasting the chicken fosters flavor development, resulting in a more tender foundation for the salad.
### Celery: The Main Component
Celery serves as the foundation of this chicken salad, comprising roughly 50% of the mixture. Its crispness adds texture and freshness, making every bite delightful. The recipe requires 3 to 4 large ribs of celery, finely diced, amounting to about 1.5 cups.
### Seasoning
Seasoning the chicken early is crucial. By salting and peppering the chicken prior to roasting, you guarantee that the flavors seep into the meat. This essential step amplifies the overall flavor of the salad.
### Extra Flavorings
Minced scallions introduce a subtle onion flavor without overpowering the dish. The recipe also incorporates smooth Dijon mustard and mayonnaise, which add creaminess and a hint of tang. The harmonious blend of these ingredients allows for tweaking based on individual taste preferences.
## Recipe Instructions
### Ingredients
– 2 bone-in skin-on chicken breasts (approximately 2 pounds)
– Olive oil
– Kosher salt
– Freshly ground black pepper
– 3 to 4 large ribs celery, finely diced (around 1.5 cups)
– 3 scallions, all parts, minced
– 1 tablespoon (15 grams) smooth Dijon mustard, plus more to taste
– 3 tablespoons (40 grams) mayonnaise, plus more to taste
### Directions
1. **Preheat the Oven**: Set the oven temperature to 350°F (176°C).
2. **Prepare the Chicken**: Lightly coat the chicken breasts in olive oil and generously season with salt and pepper. Arrange them in a baking dish and roast for 40 to 45 minutes, or until the internal temperature registers 150°F–155°F (65°C–68°C). Let the chicken cool to room temperature.
3. **Dice the Chicken**: Separate the meat from the bones and chop it into 3/4-inch (2-cm) pieces. Transfer the diced chicken to a large bowl and season with salt and pepper. Drizzle any juices from the baking dish over the chicken.
4. **Mix Ingredients**: Incorporate the diced celery and minced scallions into the bowl. Stir to blend. Add the Dijon mustard and mayonnaise, mixing until all components are evenly coated. Adjust seasoning with extra salt, pepper, or additional Dijon and mayonnaise to taste.
5. **Optional Crispy Skin**: For those who appreciate crispy textures, flatten the chicken skin on a baking sheet, season it, and bake at 400°F (205°C) for 5 to 10 minutes until crisp. Cut into strips for garnish.
## Serving Ideas
This chicken salad can be enjoyed in multiple ways. A favored method is to serve it on toasted slider rolls with a layer of crisp lettuce. Additional garnishes such as pickles, red pickled onions, or crispy chicken skin can be provided for personalization. For a complete meal, serve with ruffled potato chips, adding an extra crunch.
## Conclusion
This chicken salad recipe honors the love for celery while delivering a tasty and satisfying dish. With the proper ingredients and methods, it can become a staple in any kitchen, ideal for casual dinners or gatherings.
Refined Strawberry Chiffon Shortcake Recipe
### Strawberry Chiffon Shortcake, Refined
In 2007, the initial recipe for Strawberry Chiffon Shortcake was unveiled, featuring a charming blend of airy chiffon cake, whipped cream, and ripe strawberries. Through the years, this recipe has been refined, enhancing its accessibility and enjoyment for home bakers. Here’s a detailed overview of the enhanced version of this timeless treat.
#### The Appeal of Chiffon Cake
Chiffon cakes are known for their light, fluffy texture, which makes them a perfect option for summer desserts. They offer versatility and can be complemented with a variety of fruits and creams, maintaining their tastiness even days post-baking. The transformation of the chiffon cake recipe signifies a move towards ease and functionality, enabling more bakers to savor its allure.
#### Main Modifications to the Recipe
1. **Flour Selection**: The revised recipe opts for all-purpose flour instead of cake flour, simplifying the ingredient list while still delivering a tender texture.
2. **Type of Sugar**: Standard granulated sugar is used in place of superfine sugar, facilitating preparation without sacrificing flavor.
3. **Egg Whites and Yolks**: The updated recipe specifies an equal number of egg whites and yolks, simplifying the process.
4. **No Cream of Tartar**: Lemon juice acts as a natural acid to stabilize the egg whites, enhancing taste and minimizing the need for extra ingredients.
5. **Sifting Not Necessary**: The recipe removes the sifting requirement, simplifying the procedure.
6. **Fewer Bowls Required**: The new method decreases the number of bowls needed, easing cleanup efforts.
7. **Thinner Cake Layers**: The cake layers are now more delicate, making them easier to maneuver and assemble.
8. **Enhanced Whipped Cream**: Incorporating sour cream or crème fraîche into the whipped cream stabilizes it, making it retain its shape longer.
9. **Adjustments to Baking Powder**: The quantity of baking powder has been lowered, resulting in improved texture.
10. **Minimizing Shrinkage**: A technique of dropping the cake layers post-baking helps reduce shrinkage, yielding a more stable cake.
11. **Cooling Technique**: Inverting the cake while cooling reduces the chance of sinking in the middle, a typical problem with chiffon cakes.
#### Recipe Summary
**Ingredients:**
**Cake Layers:**
– 5 large eggs, separated
– Finely grated zest of half a lemon
– 1 1/4 cups granulated sugar, divided
– 1/3 cup plus 1 tablespoon vegetable oil
– 1/2 cup plus 2 tablespoons cold or room-temperature water
– 1 teaspoon vanilla extract
– 1 3/4 cups all-purpose flour
– 1 1/2 teaspoons baking powder
– 3/4 teaspoon kosher salt
– 1 1/2 teaspoons fresh lemon juice
**Assembly:**
– 2 1/3 cups heavy or whipping cream
– 1/4 cup powdered sugar
– 1 tablespoon vanilla extract
– 3 tablespoons sour cream or crème fraîche
– 2 pounds fresh strawberries, trimmed and sliced thin
**Instructions:**
1. **Preheat Oven**: Set to 325°F (165°C).
2. **Prepare Cake Pans**: Lightly coat two 9-inch round cake pans with nonstick spray and line them with parchment paper.
3. **Make Cake Batter**: In a mixing bowl, whisk together egg yolks, lemon zest, and 1 cup of sugar until thick and pale. Stir in oil, water, and vanilla. Gradually add flour, salt, and baking powder.
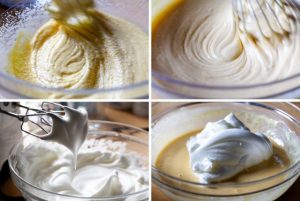
4. **Beat Egg Whites**: In a separate bowl, whip egg whites until soft peaks form. Gradually mix in remaining sugar and continue beating until stiff peaks form. Fold a portion into the yolk mixture to lighten it, then gently fold in the rest.
5. **Bake**: Divide the batter between the pans and bake for 20-25 minutes. Drop the pans on the counter to prevent shrinkage and cool upside down.
6. **Whip Cream**: Whip heavy cream with powdered sugar and vanilla until soft peaks form. Blend in sour cream or crème fraîche and whip until thick.
7. **Assemble**: Once cooled, cut each cake layer in half. Alternate layers of whipped cream and strawberries between the cake layers, finishing with whipped cream on top.
8. **Serve**: Slice into wedges and savor this delightful dessert, which stays fresh for several days.
#### Conclusion
The evolved Strawberry Chiffon Shortcake is not only simpler to prepare but also maintains the lightness and flavor that make it a cherished summer dessert. With its updated ingredients and techniques, this cake is sure to impress at any occasion, establishing itself as a favorite for celebrations and casual gatherings alike.
Read More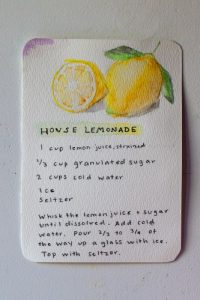
Homemade Lemonade Formula
### The Ideal Lemonade: A Must-Have for Summer
Lemonade is a staple summer drink, often bringing to mind images of sunny days and social events. Although it might appear unnecessary to share a recipe for such an easy drink, the subtle details involved in making the perfect lemonade can truly enhance your experience. This article delves into the optimal recipe for lemonade, highlighting the significance of fresh components and accurate measurements.
#### The Significance of Fresh Components
The secret to outstanding lemonade is in utilizing freshly squeezed lemon juice. Store-bought lemon juice typically fails to deliver the lively flavor that fresh juice offers, mainly due to pasteurization, which can mute the taste. For optimal results, strive to extract juice from 5-6 medium lemons, resulting in about 1 cup (235 ml) of juice.
#### Achieving Sweetness and Tartness Harmony
A frequent mistake in making lemonade is finding the right equilibrium between sweetness and tartness. Numerous recipes depend too heavily on sugar, leading to a drink that tastes excessively sweet and flat. The suggested sugar amount for this recipe is 1/3 cup (65 grams), which allows the tartness of the lemons to stand out without being overwhelmed by sweetness.
#### The Fundamental Recipe
Here’s a straightforward yet efficient recipe for homemade lemonade:
**Ingredients:**
– 1 cup (235 ml) freshly squeezed lemon juice (from 5-6 lemons)
– 1/3 cup (65 grams) granulated sugar
– 2 cups (475 ml) cold water, plus more to taste
**Instructions:**
1. Strain the freshly squeezed lemon juice through a sieve into a pitcher to eliminate any pulp.
2. Incorporate the granulated sugar and mix until completely dissolved.
3. Stir in the initial 2 cups of cold water to form the lemonade base. This base can be refrigerated for several days but is best enjoyed within the first two days.
4. To serve, add ice and modify the flavor with an additional 1/2 to 1 cup of cold water according to your taste preferences.
#### Customization Possibilities
One of the delights of making lemonade is the chance to tailor it to your preferences. Here are a few ideas for variations:
– Substitute one cup of water with watermelon juice for an invigorating twist.
– Add 1/2 cup of strained raspberry or blackberry purée for a fruity kick.
– For an adult variation, consider replacing the sugar with maple syrup and incorporating fresh mint leaves and bourbon for a distinctive cocktail.
#### Conclusion
While it might seem insignificant to provide a recipe for lemonade, the correct mix of fresh components and precise measurements can elevate this traditional drink to greater heights. Whether savored on a scorching summer day or at a gathering with friends, the perfect glass of lemonade serves as a refreshing reminder of summer’s pleasures. Embrace the simplicity of this recipe and relish the delightful taste of homemade lemonade.
Read More
Peach Cobbler-Infused Loaf Recipe
### Honing the Peach Cobbler Loaf: A Culinary Expedition
The pursuit of the ideal recipe can frequently resemble a lengthy and twisted path, laden with trials, mishaps, and a considerable amount of culinary disappointment. This is particularly true for the sought-after peach cobbler loaf, a dessert that encapsulates the spirit of summer with its succulent peaches and crumbly topping. Throughout six summers, the quest to refine this recipe has proven both demanding and fulfilling, resulting in a charming cake that embodies the season’s essence.
#### The Task of Creating the Perfect Peach Cobbler Loaf
The adventure commenced with a straightforward aspiration: to craft a one-bowl cake that highlights the inherent sweetness of peaches. Nevertheless, bringing this idea to fruition was more challenging than expected. Each summer introduced fresh attempts, with peaches surrendered to recipes that did not meet expectations. Diced peaches were flavorless, while thin slices vanished within the batter. Efforts to add spices led to a dull, beige cake that did not tantalize the taste buds.
The objective was clear: a cake that not only tasted exquisite but also presented well, with visible pieces of spiced peaches and a streusel topping reminiscent of a classic peach crumble. The ultimate vision encompassed a cake that appeared somewhat haphazard, mirroring the unpredictable nature of summer itself.
#### The Recipe: Peach Cobbler Loaf
As summer approaches its conclusion, the perfected peach cobbler loaf appears, poised for enjoyment. Here’s how to make this delightful delicacy:
**Ingredients:**
**For the Cake:**
– 1¼ pounds (565 grams) peaches, pitted and sliced into wedges
– Finely grated zest and juice from half a lemon
– 1 teaspoon ground cinnamon
– 1/3 cup (72 grams) plus 1 tablespoon (15 grams) light brown sugar, separated
– 6 tablespoons (3 ounces or 85 grams) unsalted butter, chilled
– 1/3 cup (65 grams) granulated sugar
– 1/2 cup (115 grams) plain unsweetened Greek-style yogurt or sour cream
– 2 large eggs
– 1 1/2 teaspoons baking powder
– 1/2 teaspoon baking soda
– 3/4 teaspoon kosher salt
– 1⅓ cups (180 grams) all-purpose flour
**For the Streusel:**
– 2 tablespoons (30 grams) unsalted butter, chilled
– 2 tablespoons (25 grams) granulated sugar
– Pinch of salt
– 1/4 cup (35 grams) all-purpose flour
**Instructions:**
1. **Preheat the Oven:** Set your oven to 375°F (190°C). Line a loaf pan (8×4 inches at the bottom) with parchment paper, extending it up two sides, and spray any unlined areas with nonstick spray. Position the pan on a larger baking sheet to catch any drips.
2. **Prepare the Cake:** In a large bowl, blend the finely grated lemon zest. In a separate medium bowl, toss the peach wedges with lemon juice, cinnamon, and 1 tablespoon of brown sugar. Set aside.
3. **Mix the Batter:** In the bowl with lemon zest, add melted butter, granulated sugar, and the remainder of the brown sugar. Whisk to combine, then incorporate yogurt or sour cream and eggs. Sprinkle baking powder, baking soda, and salt over the mixture, whisking well. Finally, fold in the flour until just combined.
4. **Make the Streusel:** In a small bowl, melt the remaining butter. Mix in granulated sugar, salt, and flour until crumbly.
5. **Assemble the Cake:** Pour half of the batter into the prepared pan, spreading it evenly. Layer half of the peaches on top, followed by the remaining batter. Place the other half of the peaches and pour any accumulated juices over them. Top with the streusel.
6. **Bake:** Set the pan on the baking sheet and bake for 60 to 70 minutes, or until a tester inserted into the center comes out clean. Let the cake cool on a rack.
7. **Serve:** Once cooled, lift the cake from the pan using the parchment and slice into thick pieces.
8. **Storage:** The cake is best enjoyed on the first day but its flavor develops over the next few days. Store at room temperature, unwrapped, to preserve its texture.
#### Conclusion
The peach cobbler loaf is more than just a dessert; it serves as a symbol of perseverance in the kitchen. Each trial, whether triumphant or not, has played a part in crafting a cake that is both visually stunning and delectable. As summer draws to a close, this recipe stands ready to celebrate the season’s bounty, inviting everyone to savor a slice of sweet, peachy delight.
Read More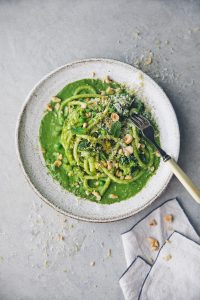
Creamy Green One-Pot Pasta Dish
### The Emergence of TikTok Pasta and Fast Recipes: A Culinary Phenomenon
In recent times, social media platforms have revolutionized how we find and exchange recipes, with TikTok spearheading the movement in trending cooking styles. One notable trend is the “TikTok pasta,” a straightforward yet flavorful dish that merges baked feta cheese and cherry tomatoes, which are then blended into a creamy sauce to mix with pasta. This dish not only exemplifies the impact of social media on cooking practices but also underscores the increasing desire for quick and effortless recipes that suit hectic lifestyles.
#### The TikTok Pasta Journey
The TikTok pasta recipe rose to significant fame for its ease and taste. It consists of placing a block of feta cheese and some cherry tomatoes in a baking tray, drizzling them with olive oil, and seasoning with salt and pepper. Once baked until the feta softens and the tomatoes burst, the blend is mashed together and incorporated with the cooked pasta. The end product is a creamy, tangy sauce that has won the hearts of many home cooks, including kids excited to try their cooking skills.
This trend not only promotes culinary inventiveness among young chefs but also nurtures a sense of independence and accomplishment, as experienced by a parent observing their child cook the dish. The sway of TikTok on cooking abilities is clear, igniting a new generation to venture into the kitchen.
#### A Fast and Creamy Kale Pasta Recipe
While TikTok pasta delights many, there are numerous other fast and simple pasta recipes to try. One such recipe includes kale, making it a healthy choice that can be whipped up in under 15 minutes. This dish is ideal for lunch, especially for children who might not be keen on greens.
**Ingredients:**
– Bucatini pasta (or any preferred pasta)
– Fresh kale
– Olive oil
– Garlic
– Parmesan cheese
– Lemon juice
– Salt and pepper
**Instructions:**
1. **Cook the Pasta:** Bring a pot of salted water to a boil and introduce the bucatini pasta. Prepare according to package directions.
2. **Prepare the Kale:** In the final minute of cooking the pasta, add the kale to the pot to wilt it.
3. **Blend the Sauce:** Set aside some pasta water, then drain the pasta and kale. In a blender, mix the wilted kale, garlic, olive oil, Parmesan cheese, lemon juice, and a splash of reserved pasta water. Blend until smooth, adjusting the thickness with additional water if necessary.
4. **Combine:** Toss the pasta with half of the kale sauce, then plate the pasta and place the remaining sauce at the bottom of the plate for an impressive presentation.
This technique not only bolsters the creaminess of the dish but also creates an attractive visual contrast on the plate. The use of bucatini pasta, which is thicker and hollow, allows it to absorb the sauce splendidly, making each bite delicious.
#### Get Involved in the Cooking Community
For those eager to try this fast and creamy kale pasta recipe, a cookalong session will be hosted on Instagram stories, offering an interactive experience to engage with the cooking journey. Participants are urged to gather the ingredients and join in, sharing their outcomes on social media for an opportunity to be highlighted.
As the culinary scene keeps evolving with social media’s influence, quick and scrumptious pasta recipes persist as favorites among families. Whether it’s the viral TikTok pasta or a creative take on a classic, these recipes not only streamline meal preparation but also promote creativity in the culinary space.
Read More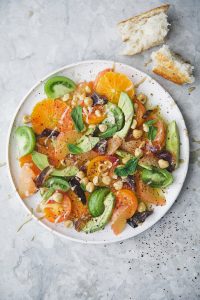
Orange, Date, and Avocado Salad Recipe for April’s Grand Affection Occasion
# Celebrating Citrus: A Refreshing Salad Recipe for Spring
With the Easter holiday on the horizon and winter’s chill retreating, it’s an opportune moment to embrace the lively tastes of citrus fruits. This piece not only presents a delightful citrus salad recipe but also showcases some intriguing culinary ventures and literature to delve into.
## Citrus Salad Recipe
This citrus salad is an uncomplicated yet eye-catching dish that melds the zesty notes of citrus with creamy avocado, crunchy hazelnuts, and sweet dates. It’s ideal for a light lunch or as an accompaniment for your Easter festivities.
### Ingredients:
– Varied citrus fruits (oranges, grapefruits, lemons)
– 1 ripe avocado
– 1/2 cup hazelnuts, roasted and chopped
– 1/4 cup dates, pitted and diced
– Extra virgin olive oil
– Salt and pepper to taste
– Bread (for soaking up the juices)
### Instructions:
1. **Prepare the Citrus**: Peel and segment the citrus fruits, eliminating any seeds. Arrange them on a serving platter.
2. **Avocado**: Halve the avocado, discard the pit, and scoop out the flesh. Slice it into thin pieces and add it to the serving dish.
3. **Add Crunch**: Scatter the toasted hazelnuts and chopped dates over the citrus and avocado.
4. **Dress the Salad**: Drizzle with extra virgin olive oil and season with salt and pepper to taste.
5. **Serve**: Relish the salad right away, paired with bread to soak up the flavorful juices.
## Culinary Inspirations and Recommendations
While savoring this delightful salad, think about diving into the following culinary endeavors and books that have piqued our interest:
– **Popl Burger**: Explore the outdoor burger spot launched by the Noma team, featuring a vegetarian burger crafted with fermented quinoa.
– **To Asia With Love**: Hetty McKinnon’s latest book is packed with simple and delectable noodle recipes that will surely ignite your culinary creativity.
– **Coming Clean Project Podcast**: Tune into the episode discussing the shift to a plant-based diet and the significance of recognizing food toxins.
– **David Chang’s Microwave Salmon**: A witty approach to preparing salmon in a microwave that has ignited vibrant conversations online.
– **Rachel Karten’s Newsletter**: A valuable tool for those intrigued by social media, offering insights and employment opportunities in the industry.
– **Heidi Swanson’s Super Natural Simple**: A stunning book that embodies California’s essence and provides fresh recipes.
– **Vegetable Tattoos**: An exciting new edition of this project is underway, featuring breathtaking illustrations.
– **Simply Julia by Julia Turshen**: A clever and balanced perspective on health and culinary practices that deserves a place in your collection.
## Easter Cooking Tips
If you’re in search of more suggestions for your Easter menu, consider these delightful selections:
– **Soups**: Sample the Asparagus & Spinach Soup or the Carrot, Tomato & Coconut Soup for a cozy starter.
– **Salads**: Beyond the citrus salad, the Grilled Asparagus and Creamy Lemon Quinoa or the Spring Celebration Salad are excellent picks.
– **Pies**: Treat your guests to the Perfect Picnic Pie or the Beet & Greens Tart.
– **Chocolate Treats**: Conclude your meal on a sweet note with Chocolate Tahini Cups or a Banana, Almond & Chocolate Cake.
As you relish the tastes of spring and the lively citrus fruits, let this salad and the accompanying suggestions inspire your culinary escapades. Happy cooking!
Read More