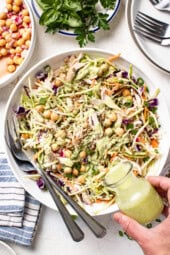
Easy Weekly Lunch: Green Goddess Chicken and Chickpea Salad
**Effortless Weekly Lunch: Green Goddess Chicken and Chickpea Salad**
In the fast-paced rhythm of everyday life, carving out time to create a healthy and flavorful lunch can prove difficult. Introducing the Green Goddess Chicken and Chickpea Salad—a lively, tasty, and satisfying dish that can be made ahead of time, streamlining your weekly lunch experience.
**Ingredients:**
– **Chicken:** Lean protein is crucial for a well-rounded diet. Grilled or roasted chicken breast acts as the ideal foundation for this salad, offering both texture and flavor.
– **Chickpeas:** Commonly referred to as garbanzo beans, chickpeas are an excellent source of plant-based protein and fiber. They impart a nutty taste and a fulfilling texture to the salad.
– **Greens:** A combination of your preferred greens like spinach, arugula, or kale not only brings freshness but also incorporates vital vitamins and minerals.
– **Vegetables:** Cucumbers, cherry tomatoes, and avocados enhance the salad’s vivid appearance and contribute additional nutrients.
– **Herbs:** Fresh herbs such as parsley, cilantro, and chives elevate the salad with their fragrant tastes.
– **Green Goddess Dressing:** The highlight of the salad, this creamy dressing features Greek yogurt, lemon juice, garlic, and a mix of fresh herbs. It’s tangy and rich, bringing all the components together.
**Preparation:**
1. **Cook the Chicken:** Season chicken breasts with salt, pepper, and a splash of olive oil. Grill or roast until fully cooked, then cut into bite-sized pieces.
2. **Prepare the Chickpeas:** Rinse and drain canned chickpeas. For enhanced flavor, roast them with a dash of paprika and olive oil until crunchy.
3. **Chop the Vegetables:** Cube cucumbers, halve cherry tomatoes, and slice avocados. Set aside.
4. **Make the Dressing:** In a blender, blend Greek yogurt, lemon juice, garlic, parsley, cilantro, chives, and a pinch of salt. Blend until smooth and creamy.
5. **Assemble the Salad:** In a large bowl, mix the greens, chicken, chickpeas, and vegetables. Drizzle with the Green Goddess dressing and toss gently to combine.
**Why It Works:**
– **Nutrient-Dense:** This salad is loaded with protein, healthy fats, and fiber, keeping you satiated and energized throughout the day.
– **Make-Ahead Friendly:** Prepare the components in advance and store them separately. Assemble the salad just before consumption to preserve freshness.
– **Versatile:** Easily modify the salad by adding other ingredients like quinoa, nuts, or seeds to align with your taste preferences and dietary requirements.
– **Flavorful:** The mix of fresh herbs and creamy dressing guarantees that every bite is rich in flavor.
**Conclusion:**
The Green Goddess Chicken and Chickpea Salad is more than just a dish; it’s a remedy for the lunchtime struggle. With its simple preparation and delightful taste, it’s sure to become a fixture in your weekly meal rotation. Relish the ease of a ready-to-eat, wholesome lunch that doesn’t sacrifice flavor or quality.
Read More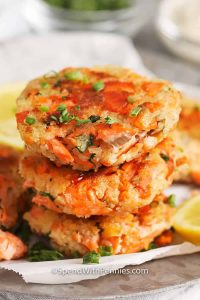
Turn Canned Salmon into a Cozy Weeknight Meal
# Salmon Croquettes: A Tasty Meal for the Family
Salmon croquettes present a crunchy, flavorful method to transform fresh or canned salmon into a simple, family-friendly dish. Baked to a golden finish and infused with herbs, lemon, and Dijon mustard, they are soft on the inside and boast a wonderfully crisp outside.
## Highlights of Holly’s Recipe: Salmon Croquettes
– **Flavor:** These offer a rich, buttery taste complemented by lively lemon, fresh herbs, and a hint of tang from Dijon mustard, all encased in a crisp golden crust.
– **Why Create It:** Utilizing canned or leftover salmon, this recipe provides a complete meal with everyday ingredients from your fridge and pantry.
– **Skill Level:** This straightforward recipe can be prepared without the need for intricate shaping or breading techniques.
– **Serving Suggestions:** Pair with tartar sauce and preferred sides, such as coleslaw, roasted veggies, and a basic green salad.
**Total Time:** 30 minutes
**Servings:** 9 Patties
**Cooking Method:** Pan-fried
## Ingredient Insights
– **Salmon:** Opt for well-drained canned pink salmon or cooked flaked salmon. Remove significant skin or bone pieces, then gently shred the salmon into small flakes without overmixing or crushing.
– **Panko Breadcrumbs:** Panko adds a lighter texture and a crispy, golden exterior. Regular breadcrumbs can work but should be added gradually as they absorb moisture in a different manner.
– **Chives:** Fresh chives contribute a mild onion essence without large chunks. For a faster alternative, substitute with thinly sliced green onions or onion powder.
– **Red Bell Pepper:** Dice the bell pepper finely to ensure it softens quickly and aids in binding the patties. Any color of bell pepper can be swapped in.
– **Mayonnaise:** Mayonnaise provides moisture and richness, keeping the croquettes tender. Plain Greek yogurt can be used for a slightly tangier taste.
## Steps to Prepare Salmon Croquettes
1. Carefully mix the ingredients in a bowl (full recipe below).
2. Shape into patties and bake until lightly browned and fully cooked.
### Tips for Ideal Salmon Croquettes
– **Drain the Canned Salmon:** Ensure it is thoroughly drained to prevent excess liquid from making the patties soggy or hard to shape.
– **Avoid Overmixing:** Stir gently and only until just blended. Excessive mixing can break down the salmon and create dense centers.
– **Chop Finely:** Cut the pepper, garlic, and herbs into small pieces. Larger pieces can create weak points around the edges.
– **Resting Period:** Allow the formed patties to chill in the refrigerator for 15 to 30 minutes. Chilling helps the crumbs absorb moisture.
– **Flip When Golden:** Turn the fried croquettes only after the first side is golden and easily lifts from the pan. A thin, wide spatula works best.
## Preserve Every Last Croquette
– **Storing:** Store leftovers in an airtight container in the fridge for up to 3 days. Place parchment between layers to keep the crust intact.
– **Reheating:** Heat in a lightly oiled skillet over medium until hot, or warm in a 375°F oven or air fryer until crispy outside.
– **Freezing Cooked Patties:** Place cooked croquettes on a parchment-lined tray until firm, then move to a freezer-safe container for up to 3 months.
– **Freezing Uncooked Patties:** Freeze in a single layer, then transfer to a freezer container once solid. Thaw overnight in the refrigerator prior to cooking.
## Additional Crispy Seafood Favorites
Did you find the Salmon Croquette Recipe enjoyable? Share your feedback and ratings below.
### Recipe for Salmon Croquettes
**Servings:** 9
**Prep Time:** 20 minutes
**Cook Time:** 10 minutes
**Total Time:** 30 minutes
#### Instructions
1. Preheat the oven to 425°F and prepare a baking sheet with parchment paper.
2. In a large bowl, mix flaked salmon, panko breadcrumbs, egg, garlic, chives, red bell pepper, mayonnaise, parsley, Dijon mustard, lemon juice, lemon zest, 1 tablespoon of olive oil, salt, and black pepper. Combine gently.
3. Using a slightly heaping ¼ cup measuring cup, scoop the mixture and form into 9 patties, pressing them together gently yet firmly to maintain their shape during baking.
4. Arrange the salmon croquettes on the prepared baking sheet and bake in the preheated oven for 13 to 15 minutes, or until lightly browned and cooked through.
### Nutritional Information (per patty)
– **Calories:** 155
– **Carbohydrates:** 5g
– **Protein:** 9g
– **Fat:** 10g
– **Saturated Fat:** 2g
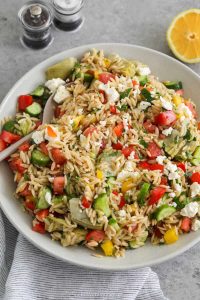
Orzo Pasta Salad: An Easy and Fast Recipe
# Mediterranean Orzo Salad
Mediterranean Orzo Salad features orzo paired with an assortment of Mediterranean vegetables and a straightforward fresh dressing. This dish works well as a vegetarian meal or as an accompaniment to grilled chicken or shrimp.
## Easy Mediterranean Orzo Salad
### What is Orzo?
Orzo is a petite rice-shaped pasta that offers versatility; it can be utilized in soups, served as a warm side, or transformed into a salad like this Mediterranean variant.
**Key Ingredients:**
– **Veggies:** Cucumbers, tomatoes, bell pepper, and artichokes
– **Bold Flavors:** Crumbled feta and green or red onion
Feel free to include or switch out other vegetables, such as drained chickpeas or fresh spinach leaves.
## Steps to Prepare Orzo Salad
1. **Boil:** Prepare the orzo following the package instructions.
2. **Prep:** While the orzo is cooking, prepare all the vegetables and chop the artichokes.
3. **Assemble:** Mix orzo with chopped and sliced vegetables and artichoke hearts. Drizzle in the dressing and toss to combine.
## Dressing for Mediterranean Orzo Salad
The dressing for this dish is very straightforward; there’s no need to blend it in a separate bowl. Simply add it straight to the salad and toss to coat. You can also substitute it with any vinaigrette or bottled Greek dressing if desired.
## Additional Fresh Simple Sides
### Recipe Overview
– **Servings:** 8
– **Prep Time:** 15 minutes
– **Cook Time:** 10 minutes
– **Total Time:** 25 minutes
### Ingredients
**For the Dressing:**
– Olive oil
– Lemon juice
– Red wine vinegar
– Dried dill
– Garlic powder
– Salt
### Instructions
1. Boil orzo in salted water according to package directions. Drain thoroughly and rinse with cold water. Set aside.
2. While the pasta cooks, chop the vegetables. Drain the artichokes well and cut into bite-sized pieces.
3. In a large bowl, mix the orzo, cucumber, tomatoes, bell pepper, and green onions.
4. Incorporate the dressing ingredients: olive oil, lemon juice, red wine vinegar, dried dill, garlic powder, and salt. Toss thoroughly to coat.
5. If desired, add feta cheese and parsley. Gently mix and chill for at least 2 hours before serving.
### Optional Additions
– Kalamata or black olives
– Red onion
### Nutrition Information (per serving)
– **Calories:** 184
– **Carbohydrates:** 24g
– **Protein:** 5g
– **Fat:** 7g
– **Sodium:** 232mg
– **Fiber:** 2g
This Mediterranean Orzo Salad serves as a refreshing and healthful choice that is simple to make and ideal for any gathering. Savor it as a dish on its own or as a side to your favorite grilled proteins.
Read More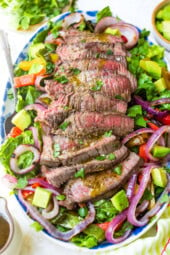
Give This Steak Fajita Salad a Go Without Tortillas
**Title: Relish the Taste: Tortilla-Free Steak Fajita Salad**
When considering the lively tastes of Mexican dishes, fajitas often spring to mind. Traditionally accompanied by tortillas, fajitas present an exquisite mix of grilled meats, peppers, and onions. Yet, if you seek a lighter, low-carb option, a tortilla-free steak fajita salad serves as the ideal substitution. This recipe captures all the yummy essence of traditional fajitas while adding a refreshing and wholesome twist.
**Ingredients:**
To prepare a steak fajita salad, you’ll require the following components:
– 1 pound of flank steak or skirt steak
– 1 tablespoon olive oil
– 2 teaspoons chili powder
– 1 teaspoon ground cumin
– 1 teaspoon garlic powder
– 1 teaspoon onion powder
– Salt and pepper to taste
– 1 red bell pepper, sliced
– 1 yellow bell pepper, sliced
– 1 green bell pepper, sliced
– 1 red onion, sliced
– 4 cups assorted salad greens (like romaine, arugula, or spinach)
– 1 avocado, sliced
– 1 cup cherry tomatoes, halved
– 1/4 cup fresh cilantro, chopped
– Juice of 1 lime
**Instructions:**
1. **Marinate the Steak:** In a small bowl, mix olive oil, chili powder, cumin, garlic powder, onion powder, salt, and pepper. Apply the blend to both sides of the steak. Allow it to marinate for a minimum of 30 minutes, or refrigerate for up to 2 hours for a deeper flavor.
2. **Grill the Steak:** Preheat a grill or grill pan over medium-high heat. Grill the steak for about 4-5 minutes on each side, or until it attains your preferred doneness. Take it off the heat and let it rest for a few moments before slicing it thinly against the grain.
3. **Sauté the Vegetables:** In a large skillet, warm a bit of olive oil over medium heat. Add the sliced bell peppers and onion. Sauté until they soften and are slightly charred, approximately 5-7 minutes.
4. **Assemble the Salad:** In a large serving bowl, mix the assorted salad greens, grilled steak slices, sautéed peppers and onions, avocado slices, cherry tomatoes, and cilantro.
5. **Dress the Salad:** Drizzle fresh lime juice over the salad and toss gently to evenly combine all ingredients. Adjust seasoning with extra salt and pepper if necessary.
6. **Serve and Enjoy:** Present the steak fajita salad right away, either as a main dish or a substantial side. This salad is not only visually appealing and appetizing but also brimming with nutrients and flavor.
**Nutritional Benefits:**
This steak fajita salad is a nutritional powerhouse. The steak offers a robust source of protein and essential amino acids, while the vibrant bell peppers and tomatoes are abundant in vitamins A and C. Avocado introduces healthy fats and a creamy texture, making the salad both fulfilling and delightful. By eliminating the tortillas, you decrease the carbohydrate content, making it suitable for low-carb and keto diets.
**Conclusion:**
A tortilla-free steak fajita salad presents a wonderful opportunity to relish the essence of fajitas in a fresh and healthy format. It’s ideal for those aiming to reduce carbs or simply desire a lighter meal option. With its striking colors and robust flavors, this salad is destined to be a favorite in your cooking repertoire. Give it a try for your next meal and enjoy the taste of Mexico in every mouthful!
Read More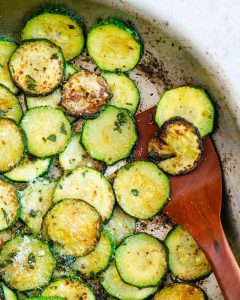
How to Sauté Zucchini Flawlessly
This sautéed zucchini recipe turns out perfectly tender every single time! In just 10 minutes, you can transform this otherwise bland vegetable into a tasty, healthy side dish.
Honestly, zucchini wasn’t my top vegetable choice when I was younger: I found it bland, watery, and frankly, rather dull. But everything changed when my mom discovered a mouthwatering sautéed zucchini recipe with Parmesan that our entire family enjoyed.
Here, I’ve replicated her recipe with a few minor adjustments—and I often find myself sneaking bites directly from the pan while preparing it! In just 10 minutes, you can elevate the humble zucchini into something truly irresistible: tender, golden, and bursting with rich flavors.
Ingredients You’ll Need
After years of trying out various cooking techniques for zucchini, I’ve concluded that sautéing is among the best methods. The trick is to use high heat to rapidly cook the zucchini while achieving a golden-brown exterior that locks in the flavor.
This recipe borrows a bit from my mom’s original version: particularly oregano and Parmesan. The outcome? Zucchini that’s tender but not mushy, flavorful yet not overpowering. Here’s what you need for this dish:
– Zucchini: Opt for small to medium for the best-looking rounds, but large ones will work too if that’s what you have. (For those enormous summer zucchinis, slice them into half-moons.)
– Olive oil or butter: Use oil for a vegan alternative, or go with butter for a richer savory taste.
– Garlic powder and onion powder: You can substitute with a diced onion and fresh garlic if you like, but dried versions keep the recipe straightforward.
– Oregano: This is my secret ingredient! I prefer dried oregano for consistent flavor, but fresh works as well.
– Parmesan cheese: Although optional, this adds an amazing savory depth that enhances the dish. I recommend using freshly grated for optimal flavor.
5 Star Reader Review
⭐⭐⭐⭐⭐ “This turned out great! Zero leftovers!” -Amy
How to Sauté Zucchini Without It Getting Soggy
Making sautéed zucchini is simple, taking only 10 minutes in a hot skillet. You do need to monitor the pan closely the entire time, as you want to ensure the layers of rounds cook evenly. Here are key points to remember:
– Use your largest skillet. Even in a large skillet, the zucchini will need to be stacked in several layers while cooking.
– Keep moving zucchini to the bottom of the pan as you cook. The pieces at the bottom of the pan will cook faster and brown quickly. Because there are multiple layers, continue to flip and shift rounds to the bottom so they can brown uniformly.
– Cover the pan for the first 2 minutes only. Covering the skillet helps steam the entire contents and cook the top layer alongside the bottom one. You’ll just do this for a few minutes initially, then follow up with a traditional sauté for the remaining cooking time.
– Avoid overcooking. Remove the pan from heat as soon as the zucchini is just tender with browned spots. Zucchini transitions from perfect to mushy very quickly, so err on the side of caution.
Ways To Serve Sautéed Zucchini
After sautéing, add that Parmesan cheese and some chopped basil if desired. It creates a stunning side dish that pairs wonderfully with just about anything, especially during summer! Here are some serving suggestions:
Storage and Reheating Instructions
Leftover sautéed zucchini can be stored in the refrigerator for up to 3 days in an airtight container. I gently reheat it in a skillet over medium heat for 2-3 minutes, stirring often. The microwave works in a pinch, but the skillet helps keep the best texture.
While the zucchini won’t be as crisp as when freshly made, it’s still delicious and works great when mixed into scrambled eggs or vegetarian frittatas. I don’t recommend freezing sautéed zucchini, as it becomes mushy once thawed.
Dietary Notes
This sautéed zucchini recipe is vegetarian and dairy-free. For vegan and plant-based options, simply omit the Parmesan cheese.
Frequently Asked Questions
How do you sauté zucchini without it getting soggy?
Utilize high heat, your largest skillet, and keep the slices moving so they brown rather than steam. Season them lightly at the end instead of the beginning, and remove the pan from heat as soon as the rounds become tender.
Is it better to sauté zucchini in butter or oil?
Both options work effectively. Olive oil offers a cleaner flavor and keeps the recipe vegan, while butter imparts a richer, savory depth.
Should you peel zucchini before sautéing?
No, always leave the skin on. It’s thin, tender, and helps keep the rounds intact as they cook, plus it retains a lot of the nutrients.
What seasoning is good on sautéed zucchini?
Read More