
Raspberry Swirl Cheesecake Bar Recipe
### Raspberry Swirl Cheesecake Bars
Cheesecake is a cherished dessert that frequently brings back warm memories and family customs. Although some might not have been raised in cheesecake-loving households, the attractiveness of this smooth delicacy is undeniable. Raspberry Swirl Cheesecake Bars provide a wonderful way to savor the traditional tastes of cheesecake with a lively twist. These bars are not just visually stunning but also easy to make, making them ideal for any event, from picnics to potlucks.
#### Ingredients
**Crust:**
– 1 cup (110 grams) graham or digestive cracker crumbs (approximately 7 sheets of grahams)
– 2 tablespoons (25 grams) granulated sugar
– Pinch of salt
– 3 tablespoons (45 grams) unsalted butter, melted
**Swirl:**
– 6 ounces (170 grams) fresh or thawed frozen raspberries
– 2 tablespoons (25 grams) granulated sugar
**Cheesecake:**
– 2/3 cup (130 grams) granulated sugar
– 1 pound (2 8-ounce or 225-gram packages) cream cheese, at room temperature
– 3 large eggs
– Finely grated zest and juice (1 to 2 tablespoons) from half a medium/large lemon
#### Instructions
1. **Preheat the Oven:** Preheat the oven to 325 degrees F (163 degrees C). Line the base and sides of an 8×8-inch square baking dish with parchment paper, ensuring it is pressed into the corners and up the sides.
2. **Make the Crust:** In a mixing bowl, combine the graham cracker crumbs, sugar, salt, and melted butter. Stir until thoroughly combined. Firmly press the mixture into the bottom of the prepared dish. Bake for 10 minutes.
3. **Prepare the Raspberry Swirl:** In a food processor or blender, blend the raspberries and sugar. Process until smooth, then strain the puree through a fine sieve into a small bowl to eliminate the seeds. Set the raspberry sauce aside.
4. **Make the Cheesecake Filling:** In a mixing bowl, beat the cream cheese with sugar until light and fluffy. Add the eggs individually, mixing thoroughly after each addition and scraping down the bowl’s sides. Lastly, blend in the lemon zest and juice. Pour the cheesecake batter over the warm crust.
5. **Assemble the Bars:** Using a squeeze bottle, piping bag, or a zip-lock bag with a corner cut off, drizzle the raspberry sauce over the cheesecake batter. Use a toothpick or skewer to swirl the raspberry sauce through the batter, creating a decorative design.
6. **Bake the Bars:** Place the pan in the oven and bake for 40 to 50 minutes, or until the cheesecake slightly jiggles when the pan is moved. Allow the bars to cool on a rack for 15 minutes, then transfer to the refrigerator to chill completely.
7. **Serve:** Once chilled, lift the bars out of the pan using the parchment paper and set them on a cutting board. Cut into 16 squares, wiping the knife between cuts for clean edges.
8. **Storage:** The bars can be kept in the refrigerator for 5 to 7 days, making them a handy make-ahead dessert.
These Raspberry Swirl Cheesecake Bars are a flawless combination of creamy cheesecake and tangy raspberry, presenting a delightful treat that is bound to impress. Whether enjoyed at a gathering or savored as a sweet treat at home, they exemplify the pleasure of baking and sharing delectable desserts.
Read More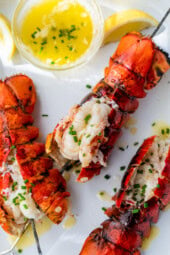
How to Flawlessly Grill Lobster Tails Each Time
**How to Grill Lobster Tails to Perfection Every Time**
Grilling lobster tails is an enjoyable method to savor this decadent seafood, providing a smoky taste that enhances its innate sweetness. Whether you’re an experienced grill chef or a beginner, adhering to a few essential steps can guarantee perfectly grilled lobster tails consistently.
**1. Choosing the Lobster Tails:**
Begin by selecting premium lobster tails. Both fresh and frozen tails are suitable, but if opting for frozen, make sure they are completely thawed prior to grilling. Seek tails that feel firm to the touch and exhibit an even color.
**2. Preparing the Lobster Tails:**
Wash the lobster tails under chilly water and dry them with paper towels. With kitchen shears, make a lengthwise cut along the top of the shell, stopping just before reaching the tail fin. Carefully open the shell and detach the meat, lifting it slightly above the shell to promote uniform cooking.
**3. Infusing Flavor with Marinade:**
Make a marinade using ingredients such as melted butter, minced garlic, lemon juice, salt, pepper, and fresh herbs like parsley or thyme. Generously brush the marinade over the lobster meat, allowing it to penetrate the cuts. Allow the tails to marinate for at least 15-30 minutes in the refrigerator.
**4. Heating the Grill:**
Preheat your grill to medium-high heat, approximately 375-400°F (190-204°C). Ensure that the grates are clean and lightly greased to avoid sticking.
**5. Grilling the Lobster Tails:**
Position the lobster tails shell-side down on the grill. Close the lid and cook for around 5-7 minutes. Turn the tails and grill for another 3-5 minutes, basting with additional marinade. The lobster is ready when the meat is opaque and firm to the touch, reaching an internal temperature of 135-140°F (57-60°C).
**6. Presentation Ideas:**
Take the lobster tails off the grill and let them sit for a few minutes. Serve with lemon wedges and extra melted butter for dipping. Complement with sides like grilled vegetables, a fresh salad, or crusty bread for a well-rounded meal.
**Success Tips:**
– Avoid overcooking, as lobster can turn tough and rubbery.
– Try out various marinades or spices to match your preferences.
– For an elegant touch, adorn with fresh herbs or a dash of paprika before serving.
By following these guidelines, you can create perfectly grilled lobster tails that are tender, flavorful, and bound to impress your guests. Relish the taste of summer with this delectable seafood creation!
Read More
Easy and Quick Chicken Dinner Recipes
**The Ultimate Quick and Simple Chicken Dinner Recipes for Hectic Weeknights**
Chicken is fundamental in numerous homes, particularly for those in search of quick and simple meals. Its adaptability renders it ideal for a variety of dishes, from soothing roasts to crisp salads. Below are some of the finest chicken recipes that necessitate little effort, ideal for hectic weeknights.
1. **One-Pan Lemon Garlic Chicken**
This recipe features chicken breasts paired with lemon, garlic, and herbs, all prepared in one pan. It’s a tangy and delicious meal that complements a side of vegetables or rice.
2. **Chicken Stir-Fry**
A speedy stir-fry with chicken, bell peppers, broccoli, and snap peas tossed in a soy sauce-based glaze. Serve it over rice or noodles for a complete meal.
3. **Chicken Caesar Salad**
Grilled chicken breast arranged atop a bed of romaine lettuce, garnished with Caesar dressing, croutons, and Parmesan cheese. It’s a light yet fulfilling choice.
4. **Chicken Alfredo Pasta**
Cooked chicken pieces combined with fettuccine pasta and a creamy Alfredo sauce. This rich and comforting dish is a favorite among families.
5. **Sheet Pan Chicken Fajitas**
Seasoned chicken strips baked alongside bell peppers and onions on a sheet pan. Serve with tortillas and your favorite toppings for a quick Mexican-inspired dinner.
6. **Chicken Soup**
A robust soup crafted with chicken, carrots, celery, and noodles. It’s perfect for a cozy night indoors and can be prepared in large quantities for leftovers.
7. **BBQ Chicken Sandwiches**
Shredded chicken blended with barbecue sauce, served on buns with coleslaw. This is a straightforward yet tasty option for a quick meal.
8. **Chicken Tacos**
Seasoned chicken cooked and served in taco shells filled with lettuce, cheese, and salsa. Personalize with your favorite toppings for a fun and easy dinner.
9. **Honey Garlic Chicken Thighs**
Succulent chicken thighs coated with a sweet and savory honey garlic sauce. This dish pairs wonderfully with a side of steamed vegetables or mashed potatoes.
10. **Chicken Pesto Pasta**
Pasta mixed with cooked chicken and pesto sauce, adorned with cherry tomatoes and Parmesan cheese. It’s a fresh and flavorful dish that comes together quickly.
These recipes are not only quick and simple but also delicious, making them ideal for any bustling weeknight. Savor the ease and taste of these chicken dishes without spending extensive hours in the kitchen.
Read More
Clásicos Platillos de Papa Mexicana
### Discovering Culinary Journeys with The Wanderlust Kitchen
In a realm where travel and cuisine converge, The Wanderlust Kitchen stands out as a lively hub for culinary lovers and travelers. Led by Linda, this blog is a goldmine of recipes and travel narratives that motivate readers to dive into varied cultures via their dishes.
#### A Voyage Through Genuine Recipes
At The Wanderlust Kitchen, genuineness is paramount. Linda compiles recipes that celebrate traditional food legacies while incorporating contemporary techniques and ingredients. This blend not only maintains the spirit of international cuisines but also renders them approachable for home chefs. From the fiery curries of India to the exquisite pastries of France, every recipe narrates a tale of its beginnings, inviting readers to embark on a culinary exploration without stepping outside their kitchens.
#### Adopting Contemporary Techniques
While honoring classic recipes, Linda also welcomes modern cooking practices. This combination of the traditional and the contemporary fosters creativity and innovation in the kitchen. Whether it’s utilizing sous-vide methods to achieve ideal textures or using seasonal produce for freshness, The Wanderlust Kitchen empowers cooks to play around and modify recipes to suit their tastes.
#### Travel Inspirations
Travel plays a pivotal role in The Wanderlust Kitchen. Each recipe is frequently paired with anecdotes from Linda’s personal journeys across the globe. These narratives not only provide context for the meals but also spark a sense of wanderlust in readers. Linda’s adventures remind us that food is a universal tongue that unites us all, regardless of our origins.
#### Invitation to Explore
A central theme of The Wanderlust Kitchen is to be daring. Linda encourages her audience to venture beyond their comfort zones, try new recipes, and delve into unfamiliar cuisines. This adventurous spirit extends beyond the kitchen, prompting readers to explore new places and immerse themselves in different cultures. The phrase “Bon Appétit! Bon Voyage!” perfectly embodies this philosophy.
#### Community and Connection
The Wanderlust Kitchen is more than merely a recipe blog; it is a community of individuals who share a love for food and travel. Linda nurtures this connection through interactive features such as comments, social media interaction, and cooking challenges. Readers are invited to showcase their culinary creations inspired by the blog, leading to a lively exchange of ideas and experiences.
#### Conclusion
The Wanderlust Kitchen is a tribute to food, culture, and adventure. With Linda at the forefront, readers are welcomed to explore the globe through authentic recipes and personal tales. Whether you are a seasoned chef or a beginner in the kitchen, The Wanderlust Kitchen has something for everyone. So, gather your ingredients, embrace your adventurous side, and embark on a culinary journey that transcends boundaries. Bon Appétit! Bon Voyage!
Read More