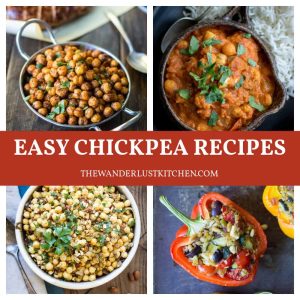
Easy and Tasty Chickpea Dishes
# Chickpeas: The Multifunctional Kitchen Essential
Chickpeas—commonly referred to as garbanzo beans—rank among the most multifunctional items you can have in your kitchen. Be it canned chickpeas or those prepared from scratch, these tiny legumes are brimming with protein, fiber, and taste. They shine in favorite dishes like hummus and falafel, yet they are equally scrumptious in everyday fare such as robust curries, refreshing salads, and speedy skillet dinners.
In this collection of chickpea recipes, you’ll discover innovative approaches to convert chickpeas into fulfilling meals with minimal effort. From vibrant, spice-laden creations simmered with garlic and aromatic spices to swift dinners that come together in less than 30 minutes, these recipes highlight how basic ingredients can pack a punch in flavor. Keep a few cans on hand in your pantry or fridge, and you’ll always be equipped for an effortless, nourishing meal.
## What Can You Create with Canned Chickpeas?
Canned chickpeas simplify the process of whipping up meals without extensive preparation. Also called garbanzo beans, they come pre-cooked and ready for use, allowing you to move from can to pan in minutes—ideal for hectic weeknights and quick meals.
There are numerous delectable ways to utilize canned chickpeas. Sauté them in a pan with garlic, olive oil, and spices for a rapid dish, incorporate them into rich curries and stews, or roast them until crunchy for a quick snack or side. You can also toss them directly from the can into fresh salads or grain bowls for added protein and crunch.
Whether you’re reaching for cans of chickpeas from your pantry or using leftovers from the fridge, these straightforward ingredients can be transformed into a diverse array of tasty meals with minimal effort.
## Why You’ll Adore Chickpeas
– Economical pantry essential
– Excellent for fast dinners
– Suitable for various cuisines (Mediterranean, Indian, Moroccan)
– High in plant-based protein
## Chickpea Main Dishes for Quick Weeknight Meals
These chickpea main dishes are filling, flavorful, and ideal for speedy dinners or meal prepping. Whether you’re in the mood for something creamy, spicy, or globally inspired, these satisfying meals showcase chickpeas as the centerpiece.
### Chickpea Tikka Masala
– **Total Time:** 45 minutes
– Relish the tastes of India with this delectable Chickpea Tikka Masala! Perfectly vegan, this dish features a wonderful mix of spices served over rice, garnished with fresh cilantro for a memorable meal. [Get The Recipe](https://thewanderlustkitchen.com/vegan-chickpea-tikka-masala/)
### Indian Chickpea Stew
– **Total Time:** 30 minutes
– In merely 30 minutes, you can enjoy Indian Chickpea Stew, a hearty combination of spiced potatoes, chickpeas, and carrots, enhanced with spinach, raisins, cashews, and a hint of lemon juice. [Get The Recipe](https://thewanderlustkitchen.com/vegan-indian-potato-chickpea-stew/)
### Moroccan Chicken with Apricots
– **Total Time:** 30 minutes
– When time is tight, this Moroccan Chicken with Apricots is the answer—vibrant, bold, and incredibly quick at just 30 minutes from start to finish. [Get The Recipe](https://thewanderlustkitchen.com/30-minute-moroccan-chicken-skillet/)
### Harissa Chicken Thighs
– **Total Time:** 50 minutes
– These Harissa Chicken Thighs are a delightful option, vibrant with chickpeas, carrots, and cauliflower. One skillet, loads of flavor, and no fuss! [Get The Recipe](https://thewanderlustkitchen.com/one-pan-roasted-harissa-chicken/)
### Greek Stuffed Peppers
– **Total Time:** 1 hour 10 minutes
– These Greek Stuffed Peppers are colorful and filled with ground meat, rice, chickpeas, and all of your favorite Mediterranean tastes! [Get The Recipe](https://thewanderlustkitchen.com/greek-stuffed-peppers/)
### Vegan Yogi Bowls
– **Total Time:** 30 minutes
– Enhance your post-yoga meals with our Vegan Yogi Bowls! Loaded with flavor and nutrients, they align perfectly with your mindful lifestyle and can be ready in 30 minutes! [Get The Recipe](https://thewanderlustkitchen.com/vegan-yogi-bowls/)
### Thai Chickpea Red Curry
– **Total Time:** 30 minutes
– Stewed to a rich and creamy texture, Thai Chickpea Red Curry combines tender potatoes, chickpeas, and red curry paste in a sauce that tastes slow-simmered, even when served in a short time.
Fast and Simple 10-Minute Pasta Sauce Recipe for Hectic Weeknights
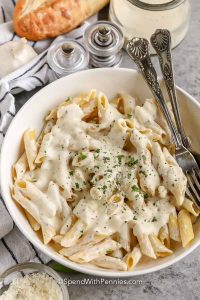
# Cream Cheese Pasta Sauce: A Cozy Pleasure
This luscious Cream Cheese Pasta Sauce offers pure comfort in a skillet. It’s indulgent, garlicky, and velvety, making it the perfect option for busy weeknight meals. The quick preparation of this sauce enables you to create a tasty dish in no time, ideal for those frantic evenings when you need something fulfilling yet simple to make.
## Balancing the Indulgence
To offset the richness of this pasta sauce, think about pairing it with a fresh green salad. The bright flavors of the salad will create a delightful contrast to the creamy sauce. Moreover, homemade garlic bread is essential to ensure you can enjoy every last bit of this scrumptious sauce.
## Holly’s Recipe Highlights: Cream Cheese Pasta Sauce
### Flavor Profile
– **Flavor**: Decadent, creamy, and savory with a subtle garlic kick and a touch of herbs.
– **Why Make It**: The sauce comes together in the time it takes to boil pasta, all in just one pot for an effortless, hassle-free dinner.
– **Serving Suggestions**: This sauce goes wonderfully with spaghetti, penne, rotini, bowties, or tortellini. For added heartiness, mix in peas, spinach, or leftover chicken.
### Quick Facts
– **Total Time**: 10 Minutes
– **Serves**: 4
– **Cooking Method**: Stovetop
## Ingredient Notes
– **Cream Cheese**: Brick-style cream cheese is best for achieving a smooth, creamy sauce. Cutting it into cubes aids in quick and even melting.
– **Broth**: Chicken broth contributes savory richness and helps thin the sauce without making it heavy or tasteless. For a vegetarian alternative, vegetable broth can be utilized.
– **Parmesan Cheese**: Freshly grated Parmesan ensures a creamier texture and superior flavor compared to pre-shredded options. For extra cheesiness, add more Parmesan or a dash of mozzarella.
– **Pasta**: Any pasta shape is suitable. Short shapes hold onto the sauce well, while spaghetti or fettuccine offers the classic Alfredo-style experience.
– **Variations**: Lighten the sauce by using half broth and half milk. Spice it up with red pepper flakes, or make it more filling by incorporating cooked chicken, shrimp, ham, bacon, or Italian sausage.
## How to Make Pasta Sauce with Cream Cheese
1. **Sauté Garlic**: In a saucepan, sauté garlic in butter. Incorporate seasonings, then add cubed cream cheese.
2. **Melt and Whisk**: Whisk cream cheese until fully melted. Gradually add broth, whisking after each addition. Continue adding all remaining broth and simmer.
3. **Finish the Sauce**: Remove from heat, mix in Parmesan, and adjust seasoning to taste.
4. **Combine with Pasta**: Immediately toss the sauce with hot pasta for even coverage.
### Tips for Success
– **Smooth Cheese Melt**: Cut the cream cheese into small cubes for rapid melting.
– **Heat Control**: Keep medium to medium-low heat once the cream cheese is integrated.
– **Pasta Water**: Reserve some pasta water to thin the sauce if it becomes overly thick.
– **Toss Immediately**: Mix the sauce with hot pasta right away to ensure even coating.
## Storing Leftovers
Store any remaining sauce in an airtight container in the refrigerator for up to 5 days. For longer preservation, freeze the sauce in an airtight container for up to 4 weeks. Note that dairy-based sauces may separate after freezing, so thaw in the refrigerator and gently reheat while whisking.
## Conclusion
This Cream Cheese Pasta Sauce is a wonderful addition to your weeknight dinner collection. Its creamy consistency and robust flavor make it a comforting choice that can be easily tailored to your preferences. Pair it with a fresh salad and garlic bread for a complete meal that’s sure to delight everyone at the table.
Read More
Crunchy Oven-Baked Chicken
**Crispy Baked Chicken: A Tasty and Health-Conscious Option**
Crispy baked chicken is an enjoyable meal that merges the pleasing crunch of fried chicken with the health advantages of baking. This preparation style is ideal for individuals who relish the texture and taste of crispy chicken but aim to lower their consumption of fried items. Here, we uncover the secrets to achieving that ideal crunchiness in the oven, alongside some tips and variations to cater to different preferences.
**The Science of Crispiness**
Obtaining a crispy texture in baked chicken requires a few essential techniques. The first is making sure the chicken skin or coating is dry before baking. Moisture hinders crispiness, so it’s important to pat the chicken dry with paper towels. Furthermore, using a baking rack permits air to flow around the chicken, facilitating even cooking and crisping.
**Ingredients for Success**
The primary components for crispy baked chicken consist of chicken pieces (such as thighs, drumsticks, or wings), a binding agent like eggs or buttermilk, and a coating mixture. The coating can incorporate various ingredients, including breadcrumbs, panko, crushed cornflakes, or a mix of flour and spices. Seasonings such as salt, pepper, garlic powder, paprika, and herbs can be included in the coating for added flavor.
**The Baking Process**
1. **Preparation**: Preheat the oven to 400°F (200°C). Line a baking sheet with foil for effortless cleanup and position a wire rack on top.
2. **Coating**: Coat each piece of chicken in the binding agent, making sure it is fully coated. Then, dredge the chicken in the coating mixture, pressing lightly to ensure it adheres.
3. **Baking**: Place the coated chicken pieces on the wire rack. This arrangement allows heat to circulate uniformly, ensuring all sides become crispy. Bake for 35-45 minutes, depending on the size of the chicken pieces, until the internal temperature reaches 165°F (74°C) and the coating is golden brown.
4. **Resting**: Allow the chicken to rest for a few minutes before serving. This lets the juices redistribute, ensuring the meat remains tender and juicy.
**Tips for Extra Crispiness**
– **Double Coating**: For a crunchier texture, dip the chicken twice in the binding agent and coating mixture.
– **Spray Oil**: Lightly mist the coated chicken with cooking oil before baking to improve browning and crispiness.
– **High Heat Finish**: Raise the oven temperature to 425°F (220°C) for the last 5-10 minutes of baking to attain a richer golden crust.
**Variations and Serving Suggestions**
Crispy baked chicken is adaptable and can be modified to fit various flavor profiles. For a kick of heat, mix cayenne pepper or hot sauce into the coating mixture. For a tangy variation, add lemon zest or Parmesan cheese. Pair the chicken with classic sides like coleslaw, mashed potatoes, or a fresh green salad. Dipping sauces such as honey mustard, barbecue, or ranch perfectly complement the dish.
In summary, crispy baked chicken is a healthier but equally mouthwatering substitute for conventional fried chicken. By implementing these techniques and suggestions, you can savor a fulfilling meal that is both crunchy and flavorful, without the added oil and calories. Whether for a family meal or a casual get-together, this dish is guaranteed to please everyone.
Read More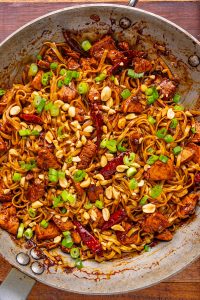
Sautéed Noodles with Fiery Kung Pao Chicken
Noodles with Kung Pao Chicken
Preparation Time: 10 minutes Cooking Time: 15 minutes Total Duration: 25 minutes Yield: 4
Delicious kung pao chicken featuring chilies and sichuan peppercorns served alongside noodles
ingredients
- 12 ounces of egg noodles
- 1 tablespoon of oil
- 1 pound of chicken breast, diced into small pieces
- 10 dried red chilies
- 4 green onions, chopped and divided (whites and greens)
- 1 teaspoon sichuan peppercorns, toasted and ground (optional)
- 1 tablespoon garlic, minced or grated
- 1 tablespoon ginger, minced or grated
- 1/4 cup chicken broth (or water)
- 2 tablespoons light soy sauce
- 1 tablespoon dark soy sauce
- 1 tablespoon chinkiang (Chinese black vinegar) (or balsamic vinegar)
- 1 teaspoon brown sugar
- 2 teaspoons cornstarch
- 1/4 cup roasted peanuts, roughly chopped
- 1 teaspoon toasted sesame oil
directions
- Prepare the egg noodles according to the instructions on the package.
- In a wok/skillet/pan, heat the oil over medium-high heat, then add the chicken and cook until lightly golden, approximately 8 minutes.
- Include the chilies and the whites of the green onions and sauté for a minute.
- Mix in the sichuan peppercorns, garlic, ginger, broth, soy sauces, vinegar, sugar, and cornstarch, then cook for 2 minutes.
- Incorporate the noodles, stir thoroughly, and cook for an additional 2 minutes.
- Remove from heat, add the greens of the green onions, peanuts, and sesame oil, then serve and enjoy!
Note: You may substitute 3 tablespoons of soy sauce for the combination of light and dark soy sauces.
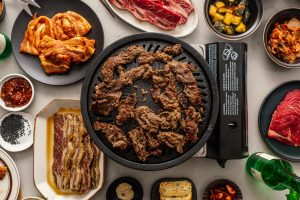
How to Savor Korean BBQ at Home: A Comprehensive Guide
# Summer is Approaching: A Guide to Home Korean BBQ
Summer is nearly upon us, and what better way to celebrate than by hosting a Korean BBQ dinner gathering at home? Korean BBQ not only tantalizes the taste buds but also provides a lively and engaging dining experience. This guide will encompass all you need to know about organizing a Korean BBQ, from its definition and what to purchase, to how to prepare the table and relish the meal.
## Reasons to Host a Korean BBQ Gathering
Korean BBQ emphasizes the harmony and contrast of flavors and textures. It is highly customizable, allowing each guest at the table to partake in exactly what they desire. When dining out for Korean BBQ, you are welcomed with a variety of small side dishes called banchan, followed by marinated meats that you cook directly at the table. The atmosphere is smoky, flavorful, and communal, making it ideal for summer get-togethers.
## What Constitutes Korean BBQ?
Korean BBQ includes grilling meat at the table, typically using a gas or charcoal grill. Common meats comprise marinated varieties like bulgogi (thinly sliced beef) and kalbi (short ribs), accompanied by assorted banchan. The core of Korean BBQ lies in grilling the meat, wrapping it in lettuce, adding sauces, and indulging in the flavors all at once.
### Key Items for Korean BBQ
To successfully host a Korean BBQ, you will require:
1. A grill or hot plate.
2. Marinated meats.
3. Fresh veggies and sauces.
4. Banchan (side dishes).
5. Beverages.
## Steps to Prepare Korean BBQ
1. **Preparation**: A few hours prior to your meal, marinate the meats, prepare the vegetables, and either buy or create your banchan. Remember to chill your beverages!
2. **Set the Table**: Cook rice and noodles, and lay out the banchan and sauces on the table.
3. **Grill**: Preheat your grill or hot plate, ensuring good ventilation. Apply oil to the grill and place the meat once it’s hot.
4. **Cook and Relish**: Grill the meat, wrap it in lettuce with toppings, and enjoy each bite. Continue this until everyone is full.
## Eating Korean BBQ
Traditionally, Korean BBQ is consumed in a form called ssam, which translates to “wrap.” Here’s how to savor it:
1. Grill the meat and slice it into manageable pieces if needed.
2. Encase the meat in a leafy vegetable.
3. Top with sauce and any other extras.
4. Enjoy in one mouthful!
## Shopping for Korean BBQ at Home
If a Korean grocery store like H-Mart is nearby, you can find all the essentials, including pre-marinated meats. If not, you can marinate the meats at home. Essential items involve:
– **Meats**: Kalbi, bulgogi, pork belly, and chicken thighs.
– **Vegetables**: Lettuce, perilla leaves, garlic, and scallions.
– **Banchan**: Kimchi, pickled veggies, and seasoned soybean sprouts.
– **Sauces**: Ssamjang (wrapping sauce) and sesame oil.
## Selecting the Appropriate Grill
For Korean BBQ, a grill or hot plate is a necessity. Choices include:
– **Charcoal**: Provides optimal flavor but is not suitable for indoor use.
– **Induction**: Safe and easy to clean, but might not achieve the high temperatures required.
– **Portable Butane Stove**: Excellent for indoor grilling if you have proper ventilation.
## Where to Purchase Meat for Korean BBQ
H-Mart is a fantastic venue for sourcing quality KBBQ meats. Other choices include local Asian grocery stores or standard supermarkets where you can acquire cuts like rib-eye or pork belly.
## Banchan for Korean BBQ
Banchan consists of small side dishes that enhance the main meal. Common banchan include:
– **Kimchi**: Fermented vegetables, often napa cabbage.
– **Kongnamul**: Seasoned soybean sprouts.
– **Danmuji**: Pickled yellow radish.
– **Gim**: Seasoned seaweed.
## Beverages for Korean BBQ
Complement your meal with traditional beverages such as beer, soju, or makgeolli. Non-alcoholic choices like iced tea also pair well.
## Final Thoughts
Korean BBQ presents a delightful opportunity to enjoy a summer dinner gathering with friends and family. With this guide, you can seamlessly set up your own Korean BBQ at home, featuring scrumptious meats, fresh vegetables, and flavorful sauces. Relish the interactive experience and the fantastic flavors that accompany it!
Read More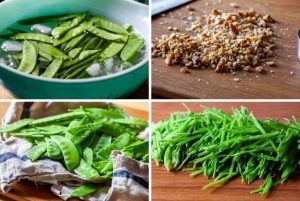
Snow Pea and Avocado Salad Dish
### Snow Pea Salad with Avocado: A Crisp Summer Delight
As the warm days of summer roll in, the search for light and invigorating meals becomes essential. One such recipe that captures this essence is the Snow Pea Salad with Avocado. This salad not only showcases the freshness of crisp snow peas but also blends a variety of textures and tastes that make it an enticing addition to any meal.
#### The Adaptability of Snow Peas
Typically, snow peas are connected to stir-fries, where their sweet, crunchy quality stands out. Nevertheless, this salad reveals their capabilities in raw dishes. The inspiration for this recipe originated from an unforgettable visit to the now-closed NoMad restaurant, where snow peas were featured in a raw salad that made a memorable impact.
#### Ingredients
To create this salad, gather the following ingredients:
– **8 ounces (225 grams) fresh snow peas**
– **½ cup (50 grams) toasted walnuts**
– **4 tablespoons (60 ml) olive oil**
– **Juice of half a large lemon (1 1/2 tablespoons/20 ml)**
– **Kosher salt, to taste**
– **Freshly ground black pepper and mild red pepper flakes**
– **1 avocado, halved, pitted, and sliced thin**
#### Preparation Steps
1. **Soak the Snow Peas**: Start by immersing the snow peas in a substantial bowl of ice water for 10 to 20 minutes. This step boosts their crispness. After soaking, drain and dry them with a towel.
2. **Slice the Snow Peas**: Collect the snow peas in small bunches and slice them lengthwise into thin strips. This method creates a slaw-like consistency that is visually pleasing and easy to enjoy.
3. **Prepare the Dressing**: In a sizable bowl, chop the toasted walnuts into small chunks. Mix in the olive oil, lemon juice, kosher salt (to taste), freshly ground black pepper, and red pepper flakes. Whisk the ingredients together until well blended.
4. **Combine Ingredients**: Incorporate the sliced snow peas into the dressing and toss them until fully coated. Carefully fold in the sliced avocado, making sure not to mash it.
5. **Serve Immediately**: For optimal flavor and texture, serve the salad right away. If making it ahead of time, add the dressing just prior to serving to keep the snow peas from losing their color.
#### Tips for Success
– **Toasting Walnuts**: Toasting nuts brings out their flavor. Spread them on a small baking tray in a 350°F oven for 6 to 10 minutes, or until they are slightly darker and aromatic. Let them cool before mixing into the salad.
– **Adjusting Seasoning**: The flavor of the salad can be tailored to personal taste. Don’t hesitate to vary the quantities of salt, pepper, and red pepper flakes to meet your preferences.
#### Conclusion
This Snow Pea Salad with Avocado is not just simple to prepare but also an ideal dish for those sizzling summer days when you desire something light yet gratifying. With its interplay of crunchy snow peas, creamy avocado, and toasted walnuts, it provides a delightful fusion of flavors and textures. Whether served as a side dish or a light main course, this salad is certain to become a staple in your summer menu.
Read More